本文源碼:GitHub·點這裡 || GitEE·點這裡
一、Eureka基本架構
1、Eureka簡介
Eureka是Netflix開發的服務發現架構,本身是一個基于REST的服務,SpringCloud将它內建在其子項目spring-cloud-netflix中,以實作SpringCloud的服務發現功能。
2、Eureka角色結構圖
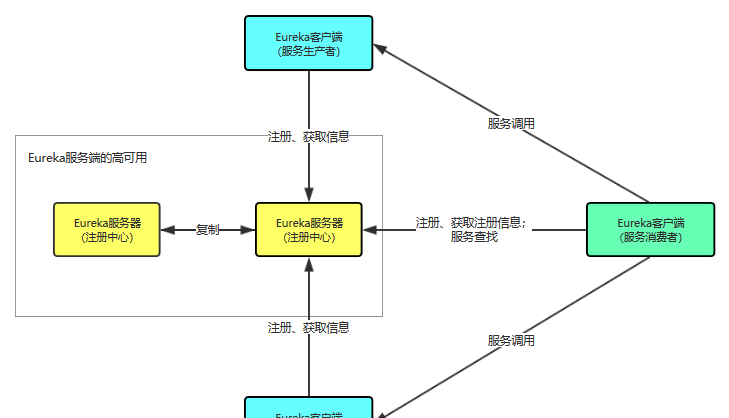
角色職責如下:
1)、Register:服務注冊中心,它是一個Eureka Server ,提供服務注冊和發現功能。
2)、Provider:服務提供者,它是一個Eureka Client ,提供服務。
3)、Consumer:服務消費者,它是一個Eureka Cient ,消費服務。
3、Eureka中幾個核心概念
1)、Registe服務注冊
當Client向Server 注冊時,Client 提供自身的中繼資料,比如IP 位址、端口、運作狀況名額的Uri 、首頁位址等資訊。
2)、Renew服務續約
Client 在預設的情況下會每隔30 秒發送一次心跳來進行服務續約。通過服務續約來告知Server該Client仍然可用。正常情況下,如果Server在90 秒内沒有收到Client 的心跳,Server會将Client 執行個體從注冊清單中删除。官網建議不要更改服務續約的間隔時間。
3)、Fetch Registries擷取服務注冊清單資訊
Client 從Server 擷取服務系統資料庫資訊,井将其緩存在本地。Client 會使用服務注冊清單資訊查找其他服務的資訊,進而進行遠端調用。該注冊清單資訊定時(每30 秒) 更新一次。
4)Cancel服務下線
Client 在程式關閉時可以向Eureka Server 發送下線請求。發送請求後,該用戶端的執行個體資訊将從Server 的服務注冊清單中删除。該下線請求不會自動完成,需要在程式關閉時調用以下代碼:
DiscoveryManager.getinstance().shutdownComponent();
5) Eviction服務下線
在預設情況下,當Client 連續90 秒沒有向Server 發送服務續約(即心跳〉時,Server 會将該服務執行個體從服務注冊清單删除,即服務下線。
二、Eureka案例代碼
1、項目基本結構圖
主要包括兩個注冊中心(叢集)
node01-eureka-7001
node01-eureka-7002
一個服務提供方
node01-provider-8001
一個服務消費方
node01-consume-8002
2、配置本機的Host檔案
# cloud host
127.0.0.1 registry01.com
127.0.0.1 registry02.com
127.0.0.1 provider-8001.com
3、注冊中心代碼分解
1)Eureka注冊中心依賴
<dependencies>
    <!--eureka-server服務端 -->
    <dependency>
        <groupId>org.springframework.cloud</groupId>
        <artifactId>spring-cloud-starter-eureka-server</artifactId>
    </dependency>
</dependencies>
2)核心配置檔案
server:
  port: 7001
spring:
  application:
    name: node01-eureka-7001
eureka:
  instance:
    hostname: registry01.com
    prefer-ip-address: true
  client:
    # false表示不向注冊中心注冊自己
    register-with-eureka: false
    # false表示該端就是注冊中心,維護服務執行個體,不去檢索服務
    fetch-registry: false
    service-url:
      # 單點注冊中心
      # defaultZone: http://${eureka.instance.hostname}:${server.port}/eureka/
      # 叢集注冊中心
      defaultZone: http://registry02.com:7002/eureka/
這裡采用叢集的配置,如果有多個叢集,逗号分隔,如下寫法就好:
defaultZone:
http://registry02.com:7002/eureka/,
http://registry02.com:7002/eureka/
3)啟動類注解
import org.springframework.boot.SpringApplication;
import org.springframework.boot.autoconfigure.SpringBootApplication;
import org.springframework.cloud.netflix.eureka.server.EnableEurekaServer;
@SpringBootApplication
@EnableEurekaServer // 注冊中心注解
public class Application_7001 {
    public static void main(String[] args) {
        SpringApplication.run(Application_7001.class,args) ;
    }
}
這樣注冊中心代碼完成。
4)啟動項目,如圖

暫時沒有服務注冊進來。
4、服務提供方代碼分解
1)核心依賴
<dependencies>
    <!-- 将微服務provider側注冊進eureka -->
    <dependency>
        <groupId>org.springframework.cloud</groupId>
        <artifactId>spring-cloud-starter-eureka</artifactId>
    </dependency>
</dependencies>
2)配置檔案如下
server:
  port: 8003
spring:
  application:
    name: node01-provider-8001
eureka:
  instance:
    hostname: provider-8001
    prefer-ip-address: true
  client:
    service-url:
      # 叢集注冊中心
      defaultZone: http://registry01.com:7001/eureka/,http://registry02.com:7002/eureka/
3)提供一個接口服務
@RestController
public class ProviderController {
    @RequestMapping("/getInfo")
    public Map<String,String> getInfo (){
        Map<String,String> infoMap = new HashMap<>() ;
        infoMap.put("作者:","知了一笑") ;
        infoMap.put("時間:","2019-05-18") ;
        infoMap.put("主題:","SpringCloud微服務架構") ;
        return infoMap ;
    }
}
4)啟動類上需要注解
import org.springframework.boot.SpringApplication;
import org.springframework.boot.autoconfigure.SpringBootApplication;
import org.springframework.cloud.client.discovery.EnableDiscoveryClient;
import org.springframework.cloud.netflix.eureka.EnableEurekaClient;

@SpringBootApplication
@EnableEurekaClient    // 本服務啟動後會自動注冊進eureka服務中
@EnableDiscoveryClient
public class Application_8001 {
    public static void main(String[] args) {
        SpringApplication.run(Application_8001.class,args) ;
    }
}
5、服務消費方代碼分解
服務消費方和提供方的代碼邏輯基本一緻。
1)配置檔案
這裡不需要注冊自己,隻是單純從注冊中心擷取服務提供方的消息。
server:
  port: 8002
spring:
  application:
    name: node01-consume-8002
eureka:
  client:
    register-with-eureka: false
    service-url:
      # 叢集注冊中心
      defaultZone: http://registry01.com:7001/eureka/,http://registry02.com:7002/eureka/
2)消費服務代碼
注意這裡的【server_name】就服務提供方的
spring:
  application:
    name: node01-provider-8001
使用RestTemplate調用服務。
@RestController
public class ConsumeController {
    @Autowired
    private RestTemplate restTemplate ;
    String server_name = "node01-provider-8001" ;
    @RequestMapping("/showInfo")
    public Map<String,String> showInfo (){
        return restTemplate.getForObject("http://"+server_name+":8001/getInfo",Map.class) ;
    }
}
到這裡,一個基于Eureka的服務注冊與發現就完成了。
3)四個服務全部啟動
4)通路如下位址
http://localhost:8002/showInfo
擷取服務接口結果
{
	"主題:": "SpringCloud微服務架構",
	"作者:": "知了一笑",
	"時間:": "2019-05-18"
}
三、源代碼案例
GitHub位址:知了一笑
https://github.com/cicadasmile/spring-cloud-base
碼雲位址:知了一笑
https://gitee.com/cicadasmile/spring-cloud-base