一、Redis3.0與3.2檔案對比
1. clone redis
git clone https://github.com/antirez/redis.git 2. checkout分支
cd redis
git checkout 3.0
git checkout 3.2
3. 比較
(1) 比較3.0和3.2檔案變化數
> git rev-list 3.0..3.2 --count
1708
(2) 比較3.0和3.2檔案變化統計
> git diff 3.0..3.2 --shortstat
比較3.0和3.2檔案變化數
二、Redis3.0與3.2預設配置檔案變化
1.配置變化
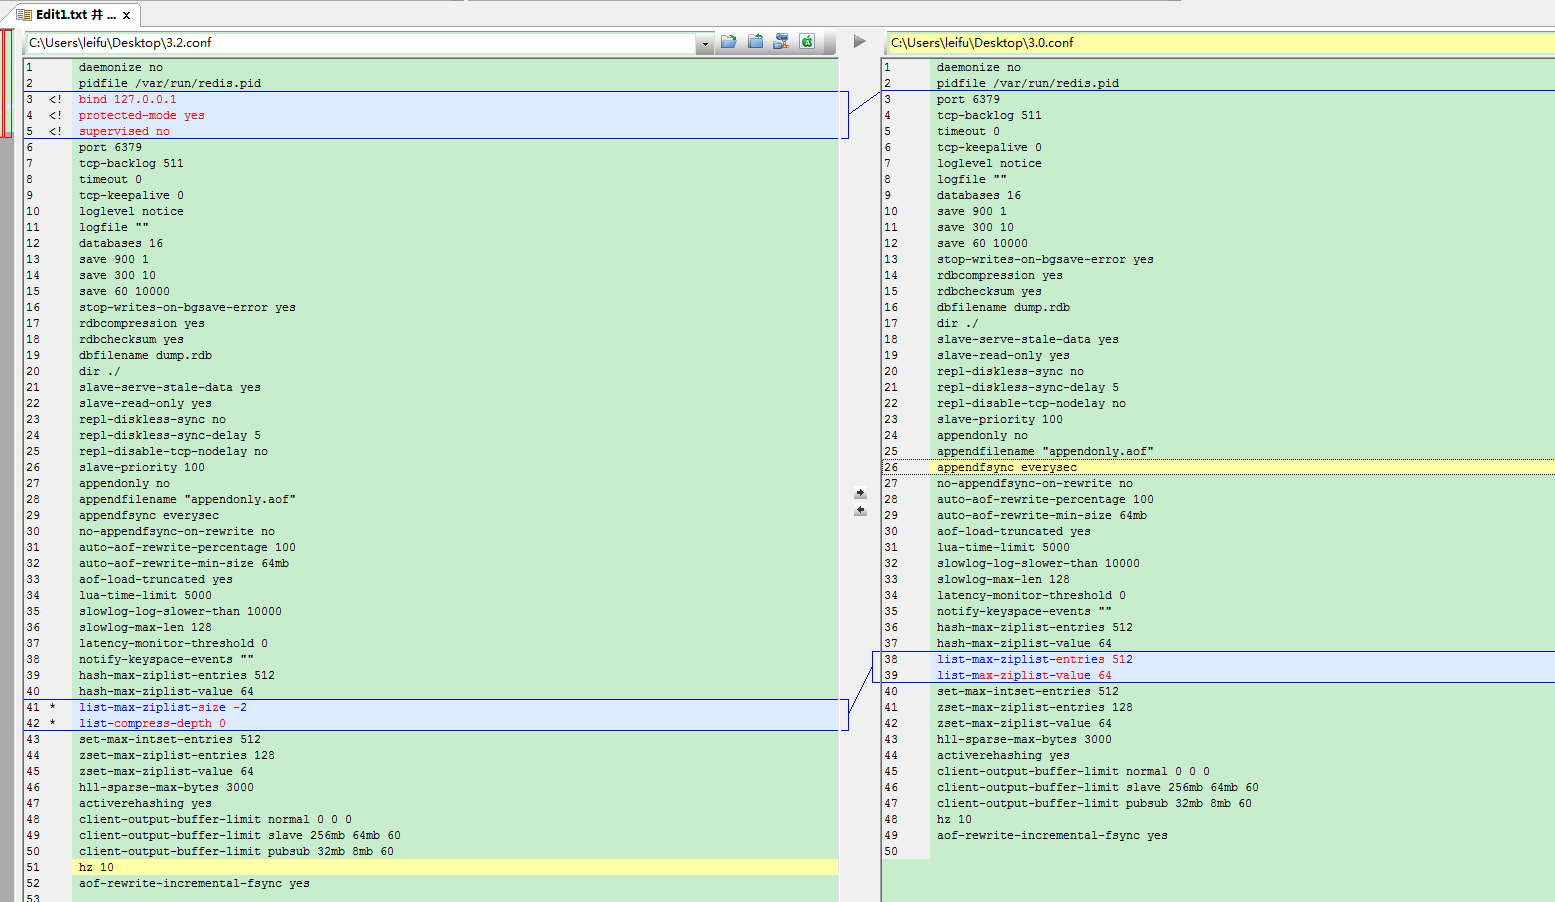
Redis3.2添加了兩個配置:
- protected-mode yes
- supervised no
Redis3.2修改了個配置:
有關list的優化,由配置一改為配置二,雖然還沒詳細了解,應該是list的底層資料結構做了一些新的變化或者優化。
配置一:
list-max-ziplist-entries 512
list-max-ziplist-value 64
配置二:
list-max-ziplist-size -2
list-compress-depth 0
配置三:
bind 127.0.0.1 bind在Redis3.2.0中預設改為127.0.0.1
2.新配置說明
- (1).protected-mode(預設是yes)
# Protected mode is a layer of security protection, in order to avoid that
# Redis instances left open on the internet are accessed and exploited.
#
# When protected mode is on and if:
#
# 1) The server is not binding explicitly to a set of addresses using the
#    "bind" directive.
# 2) No password is configured.
#
# The server only accepts connections from clients connecting from the
# IPv4 and IPv6 loopback addresses 127.0.0.1 and ::1, and from Unix domain
# sockets.
#
# By default protected mode is enabled. You should disable it only if
# you are sure you want clients from other hosts to connect to Redis
# even if no authentication is configured, nor a specific set of interfaces
# are explicitly listed using the "bind" directive.
說明
- 用一段代碼就可以說明什麼是protected-mode
if (protected-mode && !requirepass && !bind) { Allow only 127.0.0.1,::1 or socket connections Deny (with the long message ever!) others } - 其實設定成預設是為了保護對redis不了解的人,提供安全性,但是對于對于不需要bind和requirepass的使用者(例如内網),需要将protected-mode設定為no
- (2).supervised(預設是no)
# If you run Redis from upstart or systemd, Redis can interact with your
# supervision tree. Options:
#   supervised no      - no supervision interaction
#   supervised upstart - signal upstart by putting Redis into SIGSTOP mode
#   supervised systemd - signal systemd by writing READY=1 to $NOTIFY_SOCKET
#   supervised auto    - detect upstart or systemd method based on
#                        UPSTART_JOB or NOTIFY_SOCKET environment variables
# Note: these supervision methods only signal "process is ready."
#       They do not enable continuous liveness pings back to your supervisor.
可以通過upstart和systemd管理Redis守護程序,這個參數是和具體的作業系統相關的。
- (3).bind (Redis3.2.0中bind預設是127.0.0.1)
# By default, if no "bind" configuration directive is specified, Redis listens
# for connections from all the network interfaces available on the server.
# It is possible to listen to just one or multiple selected interfaces using
# the "bind" configuration directive, followed by one or more IP addresses.
#
# Examples:
#
# bind 192.168.1.100 10.0.0.1
# bind 127.0.0.1 ::1
#
# ~~~ WARNING ~~~ If the computer running Redis is directly exposed to the
# internet, binding to all the interfaces is dangerous and will expose the
# instance to everybody on the internet. So by default we uncomment the
# following bind directive, that will force Redis to listen only into
# the IPv4 lookback interface address (this means Redis will be able to
# accept connections only from clients running into the same computer it
# is running).
#
# IF YOU ARE SURE YOU WANT YOUR INSTANCE TO LISTEN TO ALL THE INTERFACES
# JUST COMMENT THE FOLLOWING LINE.
# ~~~~~~~~~~~~~~~~~~~~~~~~~~~~~~~~~~~~~~~~~~~~~~~~~~~~~~~~~~~~~~~~~~~~~~~~
bind 127.0.0.1
bind在Redis3.2.0之前預設是0.0.0.0或者說””,為了保證不太了解Redis安全性的人,在Redis3.2.0中bind預設是127.0.0.1,也就是隻有本機回環位址可以通路。如果需要配置sentinel、cluster或者需要機器機器可以通路該Redis執行個體請修改為0.0.0.0或者指定的内網IP.
- (4).list-max-ziplist-size(預設-2)
# Lists are also encoded in a special way to save a lot of space. # The number of entries allowed per internal list node can be specified # as a fixed maximum size or a maximum number of elements. # For a fixed maximum size, use -5 through -1, meaning: # -5: max size: 64 Kb <-- not recommended for normal workloads # -4: max size: 32 Kb <-- not recommended # -3: max size: 16 Kb <-- probably not recommended # -2: max size: 8 Kb <-- good # -1: max size: 4 Kb <-- good # Positive numbers mean store up to _exactly_ that number of elements # per list node. # The highest performing option is usually -2 (8 Kb size) or -1 (4 Kb size), # but if your use case is unique, adjust the settings as necessary. - (5).list-compress-depth(預設是0)
# Lists may also be compressed.
# Compress depth is the number of quicklist ziplist nodes from *each* side of
# the list to *exclude* from compression.  The head and tail of the list
# are always uncompressed for fast push/pop operations.  Settings are:
# 0: disable all list compression
# 1: depth 1 means "don't start compressing until after 1 node into the list,
#    going from either the head or tail"
#    So: [head]->node->node->...->node->[tail]
#    [head], [tail] will always be uncompressed; inner nodes will compress.
# 2: [head]->[next]->node->node->...->node->[prev]->[tail]
#    2 here means: don't compress head or head->next or tail->prev or tail,
#    but compress all nodes between them.
# 3: [head]->[next]->[next]->node->node->...->node->[prev]->[prev]->[tail]
# etc.
Redis3.2.0引入了新的quicklist的資料結構做了list的底層存儲方案。廢棄了原來的兩個配置參數,list-max-ziplist-entries和list-max-ziplist-value
127.0.0.1:6388> config get list-max-ziplist-size
1) "list-max-ziplist-size"
2) "-2"
127.0.0.1:6388> config get list-compress-depth
1) "list-compress-depth"
2) "0"
127.0.0.1:6388> lpush user_list u1 u2 u5 u7 u99 u10 u3
(integer) 7
127.0.0.1:6388> object encoding user_list
"quicklist"
在Redis3.2.0中設定原來的參數已經不生效了,應該是無法使用了。
127.0.0.1:6388> config set list-max-ziplist-entries 512
(error) ERR Unsupported CONFIG parameter: list-max-ziplist-entries
127.0.0.1:6388> config set list-max-ziplist-value 64
(error) ERR Unsupported CONFIG parameter: list-max-ziplist-value
有關quicklist的詳細使用還需要查詢文檔和源碼來研究
三、 Redis3.0與3.2關于Cluster的一些變化(來自 3.2-release-notes )
原文:
寫道
Redis Cluster changes:
All the Redis Cluster changes in 3.2 were backported to 3.0, so there is
technically nothing new for now in this release. The most important things
are:
* Cluster rebalancing.
* A pipelined MIGRATE command which is 10x faster and makes resharding
and rebalancing faster.
* Improved replicas migration.
* As a side effect of quicklists encoding (see above items), moving big
lists between nodes is now a lot faster.
Redis3.2.0的cluster完全相容Redis3.0,也就是說可以混合部署組成叢集,在Redis Cluster上Redis3.2.0沒有做什麼新的技術,但是也有一些比較重要的事情:
- Redis Cluster均衡(應該是指redis-trib.rb中實作類将slot進行負載均衡的功能)
- 提供了一個基于流水線的migrate指令,用于水準遷移資料,速度是原來的10倍多。
- 提升了從幾點遷移的功能。
- 在quicklist這種新的資料結構的幫助下,在節點之間遷移大的big list快了很多.
注意:上述特性均在Redis3.0.7有展現,如果對于Redis3.2.0不太放心的話,可以使用Redis3.0.7。
四、 Redis3.0與3.2關于Sentinel的一些變化(來自
Redis Sentinel changes:
* [NEW] Sentinel connection sharing. Makes Sentinels able to scale to
monitor many masters. (Salvatore Sanfilippo)
* [NEW] New SENTINEL INFO-CACHE command. (Matt Stancliff)
* More things backported to Redis 3.0 in the past, so no longer news of 3.2.
Sentinel connection sharing
不太了解,看着像是添加新的sentinel節點後,可以共享其他sentinel節點的master,對于sentinel監控多個master比較有用,這樣擴充sentinel節點時候比較友善配置,有關這個後面會繼續試驗。
- 提供info-cache指令
![微服務-性能壓測\緩存redis和分布式鎖redisson和SpringCache[圖]](data:image/gif;base64,R0lGODlhAQABAIAAAP///wAAACwAAAAAAQABAAACAkQBADs=)