一、 什麼是AppWidget
桌面上見到的那種一個個的小視窗,利用這個小視窗可以給使用者提供一些友善快捷的操作,有點像快捷方式。。。
二、 與AppWidget相關的資料
1、AppWidgetProviderInfo對象,為appWidget提供中繼資料,包括布局、更新頻率等等,這個對象被定義在xml檔案中
2、appWidgetProvider,定義了appWidget的基本生命周期
三、建立一個AppWidget的方法
1、定義AppWidgetProviderInfo對象
在res/xml檔案夾中定義一個名為example_appwidget_info.xml的檔案
xmlns:android="http://schemas.android.com/apk/res/android"
android:minWidth="294dp" <?最小寬度 ?>
android:minHeight="72dp" <?最小高度 ?>
android:updatePeriodMillis="86400000" <?更新時間 ,機關ms?>
android:initialLayout="@layout/example_appwidget" <?appwidget初始化的布局檔案 ?>
/>
2、為AppWidget添加布局檔案
android:id="@+id/widgetText"
android:layout_width="fill_parent"
android:layout_height="wrap_content"
android:text="myWidget"
/>
3、實作appWidgetProvider的方法
onUpdate: 在大道指定更新時間後,或者使用者想桌面添加appwidget時會調用
onDelete: 當appWidget被删除時調用
onEnabled: 當第一次建立appwidget時調用
onDisabled:當最後一個appwidget被删除時調用
onRecieve: 接收廣播 appwidget是依靠廣播機制的
4、在AndroidManifest中聲明廣播
android:name="android.appwidget.provider"
android:resource="@xml/example_appwidget_info"
/>
四、AppWidget如何使用
1、pendingIntent 用于appwidget和其他activity交換資料,appwidget和建立它的activity并不在同一個程序
2、建立pendingIntent的方法:
(1)、 getActivity() //用于啟動新的activity
(2)、 getBroadcast() //用于啟動新的廣播,廣播會在onReceive方法中接收
(3)、 getService() //用于啟動新的服務
3、 remoteViews 表示一系列的view對象,這些view對象在另一個線程
4、為remoteViews 添加監聽器的方法 :setOnClickPendingIntent
五、源代碼
1、MainActivity.java
這裡什麼都不需要操作
點選(此處)折疊或打開
public class MainActivity extends Activity
{
@Override
protected void onCreate(Bundle savedInstanceState)
{
super.onCreate(savedInstanceState);
setContentView(R.layout.activity_main);
}
public boolean onCreateOptionsMenu(Menu menu)
// Inflate the menu; this adds items to the action bar if it is present.
getMenuInflater().inflate(R.menu.main, menu);
return true;
}
2、myAppWidget.java
這裡操作AppWidget
public class appWidget extends AppWidgetProvider
//定義一個常量,用于自定義action
private static final String UPDATE_ACTION = "appwidget.UPDATE_APPWIDGET";
public void onDeleted(Context context, int[] appWidgetIds)
// TODO Auto-generated method stub
super.onDeleted(context, appWidgetIds);
public void onDisabled(Context context)
super.onDisabled(context);
public void onEnabled(Context context)
super.onEnabled(context);
public void onReceive(Context context, Intent intent)
String action = intent.getAction();
if(UPDATE_ACTION.equals(action))
{
System.out.println(action);
//得到remoteViews
RemoteViews remoteViews = new RemoteViews(context.getPackageName(), R.layout.example_appwidget);
//給remoteViews設定動作
remoteViews.setTextViewText(R.id.widgetText, "hello");
//建立AppWidgetManager
AppWidgetManager appWidgetManager = AppWidgetManager.getInstance(context);
//建立ComponentName
ComponentName compenentName = new ComponentName(context, appWidget.class);
appWidgetManager.updateAppWidget(compenentName, remoteViews);
}
else
super.onReceive(context, intent);
public void onUpdate(Context context, AppWidgetManager appWidgetManager,
int[] appWidgetIds)
//每建立一個appwidget就會添加一個id
for(int i=0; iappWidgetIds.length; i++)
System.out.println(appWidgetIds[i]);
//建立一個intent對象
Intent intent = new Intent(context, targetActivity.class);
//建立一個pendingIntent對象,利用getActivity建立,用于啟動新的activity
PendingIntent pendingIntent = PendingIntent.getActivity(context, 0, intent, 0);
//建立remoteViews
//為remoteViews綁定事件處理器,當發生click事件後執行pendingIntent
//第一個參數是被綁定的控件,第二個參數指定當事件發生時執行的pendingIntent
remoteViews.setOnClickPendingIntent(R.id.appWidgetBtn1, pendingIntent);
//更新appwidget
appWidgetManager.updateAppWidget(appWidgetIds[i], remoteViews);
Intent intent = new Intent();
//設定action,這個action需要在androidManifest中聲明
intent.setAction(UPDATE_ACTION);
//建立一個pendingIntent對象,利用getBroadcast建立,用于發送廣播,發送的廣播會在onReceive方法中接收
PendingIntent pendingIntent = PendingIntent.getBroadcast(context, 0, intent, 0);
remoteViews.setOnClickPendingIntent(R.id.appWidgetBtn2, pendingIntent);
super.onUpdate(context, appWidgetManager, appWidgetIds);
4、example_appwidget_info.xml
這個xml檔案并不是布局檔案,它是為AppWidget提供中繼資料
?xml version="1.0" encoding="utf-8"?>
appwidget-provider
xmlns:android="http://schemas.android.com/apk/res/android"
android:minWidth="294dp"
android:minHeight="72dp"
android:updatePeriodMillis="86400000"
android:initialLayout="@layout/example_appwidget"
/>
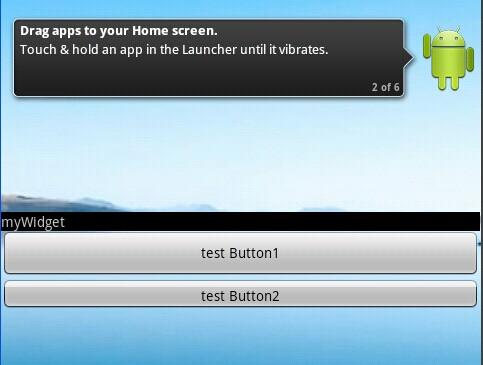
5、example_appwiget.xml
這是AppWidget的布局檔案
LinearLayout xmlns:android="http://schemas.android.com/apk/res/android"
android:layout_width="match_parent"
android:layout_height="match_parent"
android:orientation="vertical" >
TextView
android:id="@+id/widgetText"
android:layout_width="fill_parent"
android:layout_height="wrap_content"
android:text="myWidget"
android:background="#000000"
/>
Button
android:id = "@+id/appWidgetBtn1"
android:text="test Button1"
android:id = "@+id/appWidgetBtn2"
android:text="test Button2"
/LinearLayout>
6、activity_main.xml
這是MainActivity的布局檔案
RelativeLayout xmlns:android="http://schemas.android.com/apk/res/android"
xmlns:tools="http://schemas.android.com/tools"
android:paddingBottom="@dimen/activity_vertical_margin"
android:paddingLeft="@dimen/activity_horizontal_margin"
android:paddingRight="@dimen/activity_horizontal_margin"
android:paddingTop="@dimen/activity_vertical_margin"
tools:context=".MainActivity" >
android:layout_width="wrap_content"
android:layout_height="wrap_content"
android:text="@string/hello_world" />
/RelativeLayout>
![新買的便攜式藍牙标簽列印機內建測試起因分析提供的SDK開始使用藍牙測試工具進行測試列印列印亂碼分析JAVA中Unicode轉ANCI工具連結[圖]](data:image/gif;base64,R0lGODlhAQABAIAAAP///wAAACwAAAAAAQABAAACAkQBADs=)