引用:http://www.cnblogs.com/anndaming/archive/2012/02/12/2347287.html
在cocos2d-x提供的工程樣例(HelloWorld)的init函數中添加以下功能:
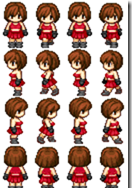
功能1:實作精靈的動作
圖檔資源:
代碼:
<a href="http://www.cnblogs.com/anndaming/archive/2012/02/12/2347287.html">?</a>
<code> </code><code>// 得到裝置螢幕的大小</code>
<code>CCSize s = CCDirector::sharedDirector()->getWinSize();</code>
<code>// 加載精靈圖檔</code>
<code>CCTexture2D *texture = CCTextureCache::sharedTextureCache()->addImage(</code><code>"player.png"</code><code>);</code>
<code>// 建立精靈角色的幀紋理,四個方向</code>
<code>CCSpriteFrame *frame0 = CCSpriteFrame::frameWithTexture(texture, CCRectMake(32*0, 48*0, 32, 48));</code>
<code>CCSpriteFrame *frame1 = CCSpriteFrame::frameWithTexture(texture, CCRectMake(32*1, 48*0, 32, 48));</code>
<code>CCSpriteFrame *frame2 = CCSpriteFrame::frameWithTexture(texture, CCRectMake(32*2, 48*0, 32, 48));</code>
<code>CCSpriteFrame *frame3 = CCSpriteFrame::frameWithTexture(texture, CCRectMake(32*3, 48*0, 32, 48));</code>
<code>// 把精靈角色的幀紋理加到動畫管理器中</code>
<code>CCMutableArray<CCSpriteFrame*> *animFrames =</code><code>new</code> <code>CCMutableArray<CCSpriteFrame*>(4);</code>
<code>animFrames->addObject(frame0);</code>
<code>animFrames->addObject(frame1);</code>
<code>animFrames->addObject(frame2);</code>
<code>animFrames->addObject(frame3);</code>
<code>// 建立精靈角色的動作對象,這裡設定成0.2秒變幀</code>
<code>CCAnimation *animation = CCAnimation::animationWithFrames(animFrames, 0.2f);</code>
<code>// 将管理器中的資源釋放掉</code>
<code>animFrames->release();</code>
<code>// 建立精靈對象,這裡把圖檔資源的第一行元素目前預設動畫效果</code>
<code>CCSprite *sprite = CCSprite::spriteWithSpriteFrame(frame0);</code>
<code>// 設定精靈對象在螢幕上的位置,</code>
<code>sprite->setPosition(ccp(s.width/2, s.height/2));</code>
<code>// 把精靈對象添加到顯示層中</code>
<code>this</code><code>->addChild(sprite);</code>
<code>// 建立動畫的執行個體</code>
<code>CCAnimate *animate = CCAnimate::actionWithAnimation(animation,</code><code>false</code><code>);</code>
<code>// 讓精靈開始動畫</code>
<code>sprite->runAction(CCRepeatForever::actionWithAction(animate));</code>
效果圖:

功能2:實作遮罩效果
代碼(緊跟功能1):
首先實作這麼一個函數:
<code>//************************************</code>
<code>// Method: spriteWithFile</code>
<code>// FullName: spriteWithFile</code>
<code>// Access: public</code>
<code>// Returns: cocos2d::CCSprite *</code>
<code>// Qualifier: 根據檔案名得到檔案資源</code>
<code>// Parameter: const char * filename</code>
<code>cocos2d::CCSprite *spriteWithFile(</code><code>const</code> <code>char</code> <code>*filename)</code>
<code>{</code>
<code> </code><code>cocos2d::CCSprite *pobSprite =</code><code>new</code> <code>CCSprite();</code>
<code> </code><code>if</code><code>(pobSprite && pobSprite->initWithFile(filename))</code>
<code> </code><code>{</code>
<code> </code><code>pobSprite->autorelease(); </code><code>// 把資源的釋放權交給引擎</code>
<code> </code><code>return</code> <code>pobSprite; </code><code>// 這樣就得到綁定指定資源的角色對象</code>
<code> </code><code>}</code>
<code> </code><code>CC_SAFE_DELETE(pobSprite);</code>
<code> </code><code>return</code> <code>NULL;</code>
<code>}</code>
在init函數中追加:
<code>// 為光圈建立一個執行個體</code>
<code>CCSprite *sprite1 = CCSprite::spriteWithFile(</code><code>"light.png"</code><code>);</code>
<code>// 設定光圈的位置</code>
<code>sprite1->setPosition(ccp(100, 100));</code>
<code>// 把光圈添加到顯示層中</code>
<code>this</code><code>->addChild(sprite1, 2);</code>
<code>// 設定光圈的動畫</code>
<code>sprite1->runAction(CCRepeatForever::actionWithAction(</code>
<code> </code><code>// 将光圈的動畫設定成序列化,采用雙補間動畫方式</code>
<code> </code><code>(CCActionInterval *)CCSequence::actions(CCMoveBy::actionWithDuration(3.0f, ccp(300, 0)),</code>
<code> </code><code>CCMoveBy::actionWithDuration(0.1f, ccp(-300,0)), NULL)));</code>
<code>// 建立遮罩對象</code>
<code>darknessLayer = CCRenderTexture::renderTextureWithWidthAndHeight(s.width, s.height);</code>
<code>// 裝置遮罩的位置</code>
<code>darknessLayer->setPosition(ccp(s.width/2, s.height/2));</code>
<code>// 将遮罩效果加到顯示層中</code>
<code>this</code><code>->addChild(darknessLayer, 20);</code>
<code>// 定義遮罩效果的色彩</code>
<code>darknessLayer->clear(0,0,0,0.5f);</code>
最後在HelloWorld中複寫draw方法如下:
<code>void</code> <code>HelloWorld::draw()</code>
<code> </code><code>// 恢複遮罩效果的色彩</code>
<code> </code><code>darknessLayer->clear(0,0,0,0.5f);</code>
<code> </code><code>cocos2d::CCLayer::draw();</code>