系列文章: 如何使用NAnt 自動打包DNN子產品 之一 如何使用NAnt 自動打包DNN子產品 之二 使用MSBuilder編譯項目時,會出現找不到引用的DLL的問題。可以參考這裡解決: http://www.beefycode.com/post/Resolving-Binary-References-in-MSBuild.aspx
安裝完NAnt之後,我們就可以使用NAnt自動打包子產品了。
跟使用NAnt完成其他任何一件任務一樣,我們需要建立一個.build檔案。大家可以下載下傳我
這個檔案作為模闆。
我們将使用MSBuilder來編譯整個項目,使用NAnt把大部分檔案壓縮到一個Resource.zip檔案,并最後制作出一個PA包和一個源代碼包。
我們來仔細看看這個.builder檔案,這是一個XML檔案,root元素是一個project, 其中包含了若幹個target元素,這些target元素就是關鍵了。這裡我着重講一下需要注意和根據需要修改的target元素,其它的部分大家可以自己看看,相信很容易了解。
先看看第一個:
初始化
<target name="init">
    <property name="nant.settings.currentframework" value="net-2.0" />

    <!-- .NET framework settings -->
    <property name="dotNetFrameworkVersion" value="v3.5" overwrite="false" />

    <!-- This is where your packaged zips will build to from within the module folder -->
    <property name="package.dir" value="package" overwrite="false" />

    <!-- This is where your resource.zip will be built so it can be zipped and distributed with the release install zips -->
    <property name="resourcezip.dir" value="ResourceZip" />
    <property name="bin.dir" value="http://www.cnblogs.com/bin" />
    <property name="controls.dir" value="controls" />
    <property name="localresource.dir" value="App_LocalResources" />
    <property name="globalresource.dir" value="App_GlobalResources" />

    <property name="binZip" value="_Install" />
    <property name="srcZip" value="_Source" />

    <property name="rootWeb" value="http://localhost/" overwrite="false" />
    <property name="webAlias" value="DNN483Source" overwrite="false" />
    <property name="verbose" value="true" overwrite="false" />

    <!-- ModuleName value should be set specific to the project -->
    <property name="CompanyName" value="AboutDNN" overwrite="false"/>
    <property name="ModuleName" value="FlashImageRotator"  overwrite="false"  />
    <property name="subproject.name" value="${CompanyName}_${ModuleName}"/>
    <property name="module.dll" value="${bin.dir}/${CompanyName}_${ModuleName}.dll" />

    <property name="debug" value="false" overwrite="false" />
    <property name="config" value="debug" if="${debug}" />
    <property name="config" value="release" unless="${debug}" />

    <sysinfo />

    <if test="${verbose}">
      <echo message="solutionName: ${subproject.name}" />
      <echo message="debug:        ${debug}" />
      <echo message="config:       ${config}" />
    </if>

  </target>
這節裡面初始化了一些跟項目有關的資訊,其中最重要的是CompayName和ModuleName了。需要修改為你們自己的名稱,這裡還有一點要注意的是,注意看那個"subproject.nam”和"module.dll”,是由CompanyName和ModuleName組合而成的,是以你的.sln檔案和DLL名稱一定要符合這個規定。比如我的CompayName是"AboutDNN”,ModuleName是"FlashImageRotator”,那麼我的.sln檔案和DLL檔案名就是這樣的:


定義如何為PA包制作Resource.zip 檔案:
<!-- Begin area for creating resourcezip for installable PA zips (should depend on target that clears where this will build zip file to)-->
  <target name="CreateResourceZip" depends="CleanResourceZip">
    <!-- create a flat directory to zip for install -->
    <mkdir dir="temp" unless="${directory::exists('temp')}" />
    <!-- DO NOT flatten this as we want to retain folder structure in this and ONLY this zip -->
    <copy todir="temp" flatten="false">
      <fileset>
        <!-- Tell nant what files to grab -->
        <!-- everything included here ends up in resource.zip, this should be excluded in the CreateBinZip -->
        <include name="**/images/*" />
        <include name="**/Flash/*" />
        <include name="**/Resources/**/*" />
        <include name="**/Docs/*.pdf" />
        <include name="**/${localresource.dir}/*.resx" />
        <include name="**/${globalresource.dir}/*.resx" />
        <include name="**/${globalresource.dir}/*.xml" />
        <include name="**/*.ascx" />
        <include name="**/*.css" />
        <include name="**/*.aspx" />
        <exclude name="**/DNNDebug.aspx" />
        <exclude name="**/Resources.zip" />
        <exclude name="**/Install/**/*" />
        <exclude name="**/_sgbak/*" />
        <exclude name="**/thumbs.db" />
        <exclude name="**/*.zip" />
        <exclude name="**/docs/images/*" />

      </fileset>
    </copy>

    <mkdir dir="${resourcezip.dir}" unless="${directory::exists(resourcezip.dir)}" />
    <zip zipfile="${resourcezip.dir}/Resources.zip">
      <fileset basedir="temp">
        <include name="**/*" />
        <exclude name="**/*.dll" />

      </fileset>
    </zip>

    <!--Delete temp directory -->
    <delete dir="temp" failonerror="false" />

  </target>
修改fileset部分就可以定義那些檔案會打包進PA安裝包的
制作源代碼包的zip檔案
<target name="CreateResourceSourceZip" depends="CleanResourceZip">
    <!-- create a flat directory to zip for install -->
    <mkdir dir="temp" unless="${directory::exists('temp')}" />
    <!-- DO NOT flatten this as we want to retain folder structure in this and ONLY this zip -->
    <copy todir="temp" flatten="false">
      <fileset>
        <!-- Tell nant what files to grab -->
        <!-- everything included here ends up in resource.zip, this should be excluded in the CreateBinZip -->
        <include name="**/images/*" />
        <include name="**/Themes/**/*" />
        <include name="**/Resources/**/*" />
        <include name="**/Documentation/**" />
        <include name="**/${localresource.dir}/*.resx" />
        <include name="**/${globalresource.dir}/*.resx" />
        <include name="**/${globalresource.dir}/*.xml" />
        <include name="**/*.ascx" />
        <include name="**/*.aspx" />
        <include name="**/*.cs" />
        <include name="**/*.sln" />
        <include name="**/*.csproj" />
        <include name="**/*.build" />
        <exclude name="**/DNNDebug.aspx" />
        <exclude name="**/Install/**/*" />
        <exclude name="**/_sgbak/*" />
        <exclude name="**/thumbs.db" />
        <exclude name="**/*.zip" />
        <exclude name="**/04.03.02.txt" />

      </fileset>
    </copy>

    <mkdir dir="${resourcezip.dir}" unless="${directory::exists(resourcezip.dir)}" />
    <zip zipfile="${resourcezip.dir}/Resources.zip">
      <fileset basedir="temp">
        <include name="**/*" />
        <exclude name="**/*.dll" />

      </fileset>
    </zip>

    <!--Delete temp directory -->
    <delete dir="temp" failonerror="false" />

  </target>
設定版本号
最後我們要保證在AssemblyInfo.cs檔案中,正确的設定了一個版本号,這樣NAnt會自動讀取這個版本号,并生成對應的打封包件。
http://images.cnblogs.com/cnblogs_com/DotNetNuke/WindowsLiveWriter/da75c0fdb745_12F40/image_6.png 到這裡,就修改完.builder檔案了。其實對于大家來說,隻需要修改初始化部分的公司名稱和項目名稱就可以了,其它部分都可以使用預設的設定。
最後我們來讓NAnt幫我們打包子產品,進入到你子產品所在的目錄,鍵入NAnt指令:
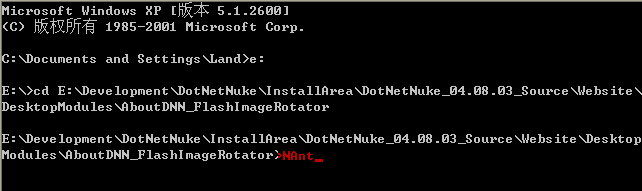
NAnt之後就會賣力的編譯子產品和打包,哈,25秒搞定:
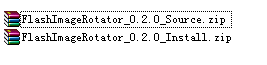
http://images.cnblogs.com/cnblogs_com/DotNetNuke/WindowsLiveWriter/da75c0fdb745_12F40/image_12.png打包好的子產品:
![2018年不想被web前端開發淘汰,你需要掌握哪些技術?[圖]](data:image/gif;base64,R0lGODlhAQABAIAAAP///wAAACwAAAAAAQABAAACAkQBADs=)