Apache伺服器的簡單配置(基于使用者的通路控制)
基于賬号的控制
1:安裝apache伺服器所要的安裝包;
httpd-manual-2.2.3-22.el5
httpd-2.2.3-22.el5
httpd-devel-2.2.3-22.el5
mod_ssl-2.2.3-22.el5
2:檢視apache伺服器可配置為文檔
Rpm –qa httpd |less
檢視的部分結果
/etc/httpd
/etc/httpd/conf
/etc/httpd/conf.d
/etc/httpd/conf.d/README
/etc/httpd/conf.d/proxy_ajp.conf
/etc/httpd/conf.d/welcome.conf
/etc/httpd/conf/httpd.conf
/etc/httpd/conf/magic
/etc/httpd/logs
/etc/httpd/modules
/etc/httpd/run
/etc/logrotate.d/httpd
3:編輯主配置文檔
Vim /etc/httpd/conf/httpd.conf
可以看到這個主配置文檔主要分3部分組成
由于我們這裡隻做簡單的使用者通路認證,是以隻需要改動327行左右的這句話AllowOverride none,改成AllowOverride all即可。
4改過之後重新開機apache伺服器
Service httpd restart
5:在apache伺服器主目錄中建立一個簡單的網頁測試
Cd /var/www/html
Touch index.html
Vim index.html
裡面随便插入點内容即可例如:
Welcome to this html !!!!
6:建立.htaccess檔案
Vim .htaccess
裡面加入:
authuserfile /var/www/html/.htpasswd (指明賬号的檔案)
authtype basic (采用基本認證方式)
authname "please input your name and passwd"
require valid-user (也可以寫具體的賬号名字)
7:産生賬号庫檔案.htpasswd
第一個賬号要這樣建立
Htpasswd –c .htpasswd zhangsan
接着會提示你輸入密碼
然後輸入密碼
以後的賬号就不用加 –c選項了
Htpasswd .htpasswd lisi
這樣執行過後檢視/var/www/html下的内容會多出一個.htpasswd檔案
ll –a
檢視結果
total 28
drwxr-xr-x 2 root root 4096 Aug 17 18:23 .
drwxr-xr-x 8 root root 4096 Aug 1 05:34 ..
-rw-r--r-- 1 root root 116 Aug 17 17:48 .htaccess
-rw-r--r-- 1 root root 42 Aug 17 17:50 .htpasswd
-rw-r--r-- 1 root root 25 Aug 17 18:17 index.html
8:檢視.htpasswd裡面的内容會發現zhangsan,lisi 兩個賬号(注意這兩個賬号并不是本地賬号庫上的賬号而是apache認證的賬号)
9:進行測試:
用本機測試
Links http://127.0.0.1
在這裡我用其他windows機器測試
結果你會看到一個認證對話框讓你輸入使用者名和密碼:
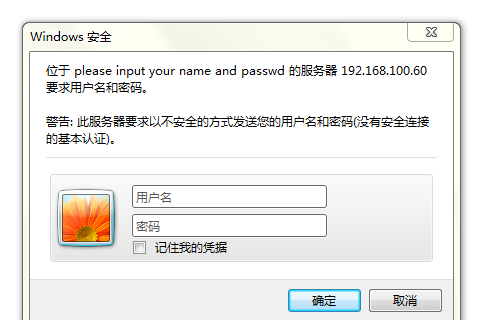
輸入使用者名密碼後

基于主機的控制
1:編輯/etc/httpd/conf/httpd.conf
vim /etc/httpd/conf/httpd.conf
修改332行左右的
Order allow,deny
Allow from all
假如要控制192.168.100.100主機的通路那麼改為
Deny from 192.168.100.100
如果是某網段那麼後面跟網段
後面的關于apache伺服器的相關内容會繼續深入,請大家多多關注!
Apache關于證書認證(1)
以linux為頒發機構同時又是CA server(隻隻用于本區域)
1:Cd /etc/pki/tls
Ll tls
可以看到
total 40
lrwxrwxrwx 1 root root 19 Aug 1 05:31 cert.pem -> certs/ca-bundle.crt
drwxr-xr-x 2 root root 4096 Aug 1 05:34 certs
drwxr-xr-x 2 root root 4096 Aug 1 05:31 misc
-rw-r--r-- 1 root root 9831 Aug 17 22:53 openssl.cnf
drwxr-xr-x 2 root root 4096 Aug 1 05:34 private
然後vim openssl.cnf
把45行改成
dir = /etc/pki/CA # Where everything is kept
然後wq儲存退出
2:接着生成證書的私鑰
Cd /etc/pki/CA
用openssl工具生成
Openssl genrsa 1024 >private/cakey.pem
3:接着用私鑰生成自己的證書
Openssl req –x509–new –key private/cakey.pem –out cacerts.pem –days 3650
然後填寫注冊資訊
4:用上面的這個CA為本linux站點頒發證書
建立一個檔案夾專門存放呗頒發的證書檔案
Mkdir /etc/httpd/certs
5:接着生成站點的證書鑰匙
Cd /etc/httpd/certs
Openssl genrsa 1024 >httpd.key
6:為了安全起見更改這個檔案的權限
Chmod 600 httpd.key
7:用這個密鑰為站點頒發證書
Openssl req –new –key httpd.key –out httpd.csr
8:建立所需要的目錄和檔案(注意是在/etc/pki/CA)
Mkdir certs crl newcerts
Touch index.txt serial
9:給serial一個号碼
Echo “01” >serial
然後填寫注冊資訊注意一定要與前面的一直
10:由于本站點和跟CA都在這台linux上面是以不用傳遞申請了直接執行這條指令
Openssl ca –in httpd.csr –out httpd.crt
11:然後修改/etc/httpd/conf.d/ssl.conf
Vim /etc/httpd/conf.d/ssl.conf
修改大概112行的
#SSLCertificateFile /etc/pki/tls/localhost.crt改成
SSLCertificateFile /etc/httpd/certs/http.crt
修改大約120行左右的
#SSLCertificateKeyFile /etc/pki/tls/private/localhost.key改成
SSLCertificateKeyFile /etc/httpd/certs/httpd.key
把130行的#SSLCertificateChainFile /etc/pki/tls/certs/server-chain.crt
注釋#号去掉
最後儲存退出
12:最後重新開機Apache服務
13:測試
找其他測試電腦
https://192.168.101.60(伺服器的位址)
你會看到
輸入使用者名密碼
會看到你的首頁面