Effective marketing campaigns use a network of multiple channels and involve a lot of repetitive tasks with interrelated complexities. Mautic, and other similar software, are powerful tools that make these complex and repetitive tasks easy. Marketing automation software tracks every lead, or visitor to your website and other online locations, and analyzes visits to build a profile of visitors and automates actions based upon their activity. Integrations with popular Customer Relationship Management (CRM) software provide a constant stream of high quality leads ready to be converted into sales and clients.
Marketing Automation is like a bridge between your leads and your customers.
Mautic provides a mechanism to develop and target multi-channel marketing resources, from dynamic web content and landing pages, forms, automated email engagement and marketing, to web notifications, text messages, tweets, and social monitoring. It has integrations with third party platforms including Salesforce CRM, Sugar CRM, Microsoft Dynamics CRM, Zoho CRM, FullContact, MailChimp, ConnectWise, and many more. Since it is open source, it is also completely customizable with a healthy developer community building all manner of other integrations.
I will be using a root user to issue commands in the examples. If you are not using the root user, please remember to issue the sudo command before each command where root privileges are necessary.
In the code and command examples I will be using 'example.com' as the domain. This will need to be replaced by your own domain when you follow along. In the images used to illustrate each step, I have used a free domain I had available 'duang.party', again remember in your commands use your own domain.
Before you begin this tutorial, you should have an Alibaba Cloud ECS instance provisioned and running, with at least 1GB of memory.
You should also have a domain name available to use.
If you have created your instance, you should be viewing it in your Alibaba Cloud ECS Management Console. Locate 'Security Groups' from the left horizontal navigation bar and click it to go to your Instance's Security Group:
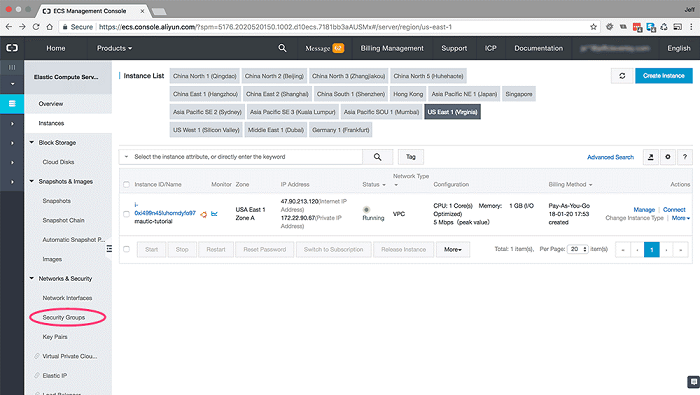
<Click Security Groups on your Instances Page>
You should now see your security group in the Security Group list. Locate the 'Configure Rules' option at the right of your security group row, and click it.

<Choose Configure Rules for your Security Group>
You will now be taken to a page with two tabbed panels. One tab will show you your Inbound Security Group Rules, the other will show you the Outbound rules.
Webinoly Requires the following inbound Ports open:
• 22/22 (SSH)
• 80/80 (HTTP)
• 443/443 (HTTPS)
• 2222/2222 (Webinoly Tools)
Each Port should be using the following further settings:
<b>Authorization Type:</b> Address Field Access
<b>Authorization Object:</b> 0.0.0.0/0
When you have completed this, your Security Group Rules Inbound tab should look like:
<Security Group Inbound Ports>
Webinoly and Mautic require the following outbound Ports open:
• 25/25 (SMTP)
• 11371/11371 (Access GPG Keys)
When you have completed this, your Security Group Rules Outbound tab should look like:
<Security Group Outbound Ports>
Now we need to go to the Alibaba Cloud DNS management section of your console, you can find this in the left horizontal main menu. Inside the Basic DNS section, click the blue 'Add Domain' button in the top right to add your domain:
<Open Alibaba Cloud DNS>
<Add your domain>
Your domain will appear in the list. Now you need to configure some DNS records for it:
<Configure DNS Records for your domain>
You will need to add at least two records. An 'A' record for '@' (all) host, with the value of your Instance public IP address. And a 'CNAME' record for 'www' host, with the value of your domain name.
Your Domain's DNS settings should look similar to this:
<Configure your A and CNAME DNS records>
If you are using a domain with Alibaba Cloud Domains, then you should be finished here.
If you are using a domain registered with a third party domain registrar, you will need to log in to your account at your domain registrar and change your domain's nameservers (DNS servers) to point to the Alibaba Cloud nameservers.
You will find the correct nameservers provided at the top of your DNS records page:
<Make sure your domain nameservers are set to the Alibaba Cloud DNS servers>
In your Alibaba Cloud Console Home, locate 'Direct Mail' and click it:
<Alibaba Cloud Direct Mail in your Cloud Console>
In the Direct Mail overview panel, first click on Email Domains in the left horizontal navigation:
<Choose Email Domains first>
The click the 'New Domain' button in the top right:
<Click to create a New Domain>
You will need to add a domain. To avoid conflicts with your main domain email, choose a subdomain to use. I suggest prefixing your domain with 'dm.':
<Add a subdomain to use for Direct Mail>
Your new Email Subdomain will appear in the list. You now need to click configure:
<Click configure to get your Direct Mail Verification records>
A new window will open, it will provide you with several DNS records you need to set in your Alibaba Cloud DNS records for your domain. These are used for verification, and for receiving and tracking configuration:
<Alibaba Cloud Direct Mail provides you with additional DNS records>
Now go back to Alibaba Cloud DNS, and enter each of these records and their values in your domains DNS records.
Once you have added these records your domains DNS should look similar to this:
<Add the Additional DNS records to your Domains DNS>
Now you are ready to verify ownership of the email domain. Return to your email subdomain in Direct Mail and click verify:
<Click Verify in your Direct Mail email domain>
Assuming everything has been configured properly, your domain status should change to 'verification successful', highlighted in green:
<Email domain verification successful>
Now open the Sender Addresses panel and click Create Sender Address:
<Sender Addresses panel - Create Sender Address>
Choose your email domain from the dropdown menu.
You will need to add an account name. This name will be used to create the sender address. This will be your SMTP username in the following format:
You will also need to set a Reply-To address. This is not the Reply-To address used by SMTP in Mautic, it is only used for communication with the Alibaba Cloud console, but it must be verified before you can progress and set up your SMTP password.
Next chose your mail type. You can choose either 'Triggered Emails' or 'Batch Emails'. In real world usage of Mautic, you would set up both, Triggered Emails for transactional emails, and Batch Emails for Email newsletters and mass mail-outs. For the purposes of this tutorial I will choose 'Triggered Emails'.
<Set your Direct Mail sender address>
Direct Mail will immediately send an email to the Reply-To address you set. You will need to go to your email inbox and click a link before you can proceed further.
Once you have verified your email, click on the 'Set SMTP Password':
<Set your SMTP Password>
For the Singapore region the server address is currently:
Webinoly is an excellent tool that automates the installation of an optimized LEMP web server stack on any Ubuntu 16.04 Instance. It installs Nginx, MariaDB (MySql) and PHP7, alongside command line tools to automate the provisioning of Let's Encrypt SSL Certificates, FastCGI Static Caching, Redis and Memcached Object Caching servers, and logging tools to help manage your server stack.
Install the full Webinoly LEMP stack to your instance with the following command:
Once Webinoly has completed its installation, you will be provided with the root and admin user passwords for your MariaDB MySQL database. Please make a record of them, you will need them:
<Webinoly has been installed>
With Webinoly it is incredibly easy to configure your Nginx Virtual Host for your site.
Issue this command:
Webinoly will quickly respond with a success message:
<Create a site and virtual host with Webinoly>
Webinoly has now created the directory structure and root directory for your site, <b>and</b> configured the Nginx virtual host configuration file necessary to run a PHP based site from it.
Your Nginx Virtual host configuration file is located at '/etc/nginx/sites-available/' and has been automatically symlinked into '/etc/nginx/sites-enabled/'.
You can open it to inspect it with:
<Webinoly automatically configures your Nginx Virtual Host>
Your site root directory has been created at '/var/www/htdocs/'.
To obtain a Let's Encrypt SSL certificate and enable HTTPS on your domain with Webinoly, issue the following command:
You will be asked to provide an email address and a cron job will be created to automatically renew your certificate every week.
<Obtain a Let's Encrypt SSL with Webinoly>
Since Webinoly uses Certbot by Let's Encrypt, your Nginx Virtual Host Configuration file will be automatically updated to serve your site using HTTPS (port 443).
Login to your MariaDB (MySQL) using your the root password provided earlier (when Webinoly completed installation):
Now create your database and the user you require by entering the following successive MySQL commands:
Make sure you choose a strong password. Once you have done this, flush privileges and exit MySQL:
<Create your Mautic Database>
Change directory into your site's root directory, and download the latest Mautic ZIP archive:
<Download the latest Mautic release>
Finally, unzip the archive:
First, from within the root directory, delete the 'mautic.zip' archive, and then list out the directory with ownership and permissions:
You will see that currently all of the Mautic directory contents are owned by the 'root' user:
<Root user still owns all the Mautic Files and Directories>
We need to make the web server user and group 'www-data' the owner of all of these files and directories.
Do that with the following command, and then list out the directory again to ensure everything has been successful:
Now you should see 'www-data' as the owner of the root directories contents:
<www-data now owns the directory and its contents>
We have prepared everything we need, now we just need to run the Mautic installer, to do that just visit your domain:
Mautic will do an environment check, and let you know when it is ready to install:
<Mautic Installer Environment Check>
Next you will need to provide the installer with your database details. Enter the database settings for your Mautic database:
<Connect Mautic to your database>
Now we create an Administrative user:
<Create your Admin account>
The final step in the Mautic installer set up is the email configuration. These settings can be changed later from within Mautic, but we can set them up now.
Choose your sender and sender email.
For mail transport, select 'Other SMTP server'
Choose how you want Emails handled, immediately or queued.
Choose Port 465 and SSL Encryption and Login Authentication mode.
Enter the SMTP username and Password you created in Step 3 above.
<Configure Mautic to use Direct Mail - Then click next step>
Mautic will take you to its dashboard and we are ready to start automating our marketing!
If you want to check that Direct Mail is working. Click on the Settings Icon in the top right, then on Email settings. There is a Green 'Test Connection' button, click this. If everything is working perfectly you will get a success message.
<Test Direct Mail in the Mautic Admin settings>