曹林華 運維 2020-09-08
來自:51CTO部落格,作者:曹林華
連結:https://blog.51cto.com/13527416/2117141
本篇主要講工作中的真實經曆,我們怎麼打造億級日志平台,同時手把手教大家建立起這樣一套億級 ELK 系統。日志平台具體發展曆程可以參考上篇 「從 ELK 到 EFK 演進」
廢話不多說,老司機們座好了,我們準備發車了。
整體架構
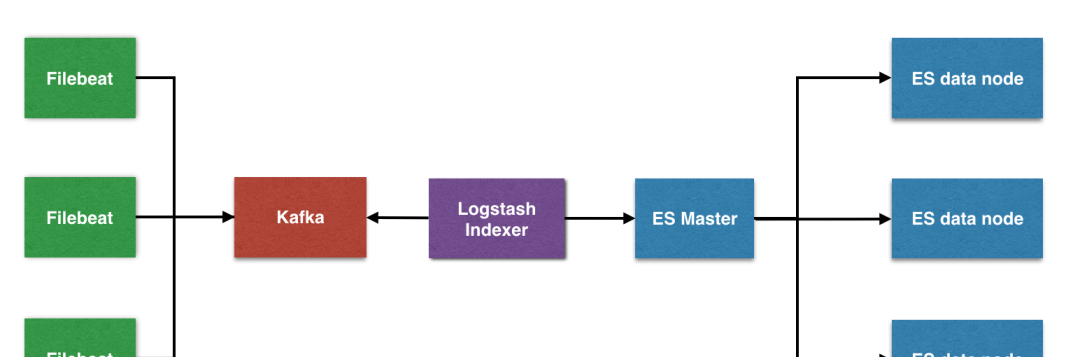
整體架構主要分為 4 個子產品,分别提供不同的功能Filebeat:輕量級資料收集引擎。基于原先 Logstash-fowarder 的源碼改造出來。換句話說:Filebeat就是新版的 Logstash-fowarder,也會是 ELK Stack 在 Agent 的第一選擇。Kafka: 資料緩沖隊列。作為消息隊列解耦了處理過程,同時提高了可擴充性。具有峰值處理能力,使用消息隊列能夠使關鍵元件頂住突發的通路壓力,而不會因為突發的超負荷的請求而完全崩潰。Logstash :資料收集處理引擎。支援動态的從各種資料源搜集資料,并對資料進行過濾、分析、豐富、統一格式等操作,然後存儲以供後續使用。Elasticsearch :分布式搜尋引擎。具有高可伸縮、高可靠、易管理等特點。可以用于全文檢索、結構化檢索和分析,并能将這三者結合起來。Elasticsearch 基于 Lucene 開發,現在使用最廣的開源搜尋引擎之一,Wikipedia 、StackOverflow、Github 等都基于它來建構自己的搜尋引擎。
Filebeat: 6.2.4 Kafka: 2.11-1 Logstash: 6.2.4 Elasticsearch: 6.2.4 Kibana: 6.2.4 相應的版本最好下載下傳對應的插件 具體實踐
我們就以比較常見的 Nginx 日志來舉例說明下,日志内容是 JSON 格式
{"@timestamp":"2017-12-27T16:38:17+08:00","host":"192.168.56.11","clientip":"192.168.56.11","size":26,"responsetime":0.000,"upstreamtime":"-","upstreamhost":"-","http_host":"192.168.56.11","url":"/nginxweb/index.html","domain":"192.168.56.11","xff":"-","referer":"-","status":"200"}{"@timestamp":"2017-12-27T16:38:17+08:00","host":"192.168.56.11","clientip":"192.168.56.11","size":26,"responsetime":0.000,"upstreamtime":"-","upstreamhost":"-","http_host":"192.168.56.11","url":"/nginxweb/index.html","domain":"192.168.56.11","xff":"-","referer":"-","status":"200"}{"@timestamp":"2017-12-27T16:38:17+08:00","host":"192.168.56.11","clientip":"192.168.56.11","size":26,"responsetime":0.000,"upstreamtime":"-","upstreamhost":"-","http_host":"192.168.56.11","url":"/nginxweb/index.html","domain":"192.168.56.11","xff":"-","referer":"-","status":"200"}{"@timestamp":"2017-12-27T16:38:17+08:00","host":"192.168.56.11","clientip":"192.168.56.11","size":26,"responsetime":0.000,"upstreamtime":"-","upstreamhost":"-","http_host":"192.168.56.11","url":"/nginxweb/index.html","domain":"192.168.56.11","xff":"-","referer":"-","status":"200"}{"@timestamp":"2017-12-27T16:38:17+08:00","host":"192.168.56.11","clientip":"192.168.56.11","size":26,"responsetime":0.000,"upstreamtime":"-","upstreamhost":"-","http_host":"192.168.56.11","url":"/nginxweb/index.html","domain":"192.168.56.11","xff":"-","referer":"-","status":"200"} Filebeat
為什麼用 Filebeat ,而不用原來的 Logstash 呢?
原因很簡單,資源消耗比較大。由于 Logstash 是跑在 JVM 上面,資源消耗比較大,後來作者用 GO 寫了一個功能較少但是資源消耗也小的輕量級的 Agent 叫 Logstash-forwarder。後來作者加入 elastic.co 公司, Logstash-forwarder 的開發工作給公司内部 GO 團隊來搞,最後命名為 Filebeat。Filebeat 需要部署在每台應用伺服器上,可以通過 Salt 來推送并安裝配置。下載下傳
$ wget https://artifacts.elastic.co/downloads/beats/filebeat/filebeat-6.2.4-darwin-x86_64.tar.gz 解壓
tar -zxvf filebeat-6.2.4-darwin-x86_64.tar.gzmv filebeat-6.2.4-darwin-x86_64 filebeatcd filebeat 修改配置
修改 Filebeat 配置,支援收集本地目錄日志,并輸出日志到 Kafka 叢集中
$ vim fileat.yml filebeat.prospectors: - input_type: log paths: - /opt/logs/server/nginx.log json.keys_under_root: true json.add_error_key: true json.message_key: log output.kafka: hosts: ["192.168.0.1:9092,192.168.0.2:9092,192.168.0.3:9092"] topic: 'nginx' Filebeat 6.0 之後一些配置參數變動比較大,比如 document_type 就不支援,需要用 fields 來代替等等。
啟動
$ ./filebeat -e -c filebeat.yml Kafka
生産環境中 Kafka 叢集中節點數量建議為(2N + 1 )個,這邊就以 3 個節點舉例
下載下傳
直接到官網下載下傳 Kafka
$ wget http://mirror.bit.edu.cn/apache/kafka/1.0.0/kafka_2.11-1.0.0.tgz tar -zxvf kafka_2.11-1.0.0.tgzmv kafka_2.11-1.0.0 kafkacd kafka 修改 Zookeeper 配置
修改 Zookeeper 配置,搭建 Zookeeper 叢集,數量 ( 2N + 1 ) 個
ZK 叢集建議采用 Kafka 自帶,減少網絡相關的因素幹擾
$ vim zookeeper.properties tickTime=2000 dataDir=/opt/zookeeper clientPort=2181 maxClientCnxns=50 initLimit=10 syncLimit=5 server.1=192.168.0.1:2888:3888 server.2=192.168.0.2:2888:3888 server.3=192.168.0.3:2888:3888 Zookeeper data 目錄下面添加 myid 檔案,内容為代表 Zooekeeper 節點 id (1,2,3),并保證不重複。
$ vim /opt/zookeeper/myid1 啟動 Zookeeper 節點
分别啟動 3 台 Zookeeper 節點,保證叢集的高可用
$ ./zookeeper-server-start.sh -daemon ./config/zookeeper.properties 修改 Kafka 配置
kafka 叢集這邊搭建為 3 台,可以逐個修改 Kafka 配置,需要注意其中 broker.id 分别 (1,2,3)
$ vim ./config/server.propertiesbroker.id=1port=9092host.name=192.168.0.1num.replica.fetchers=1log.dirs=/opt/kafka_logsnum.partitions=3zookeeper.connect=192.168.0.1: 192.168.0.2: 192.168.0.3:2181zookeeper.connection.timeout.ms=6000zookeeper.sync.time.ms=2000num.io.threads=8num.network.threads=8queued.max.requests=16fetch.purgatory.purge.interval.requests=100producer.purgatory.purge.interval.requests=100delete.topic.enable=true 啟動 Kafka 叢集
分别啟動 3 台 Kafka 節點,保證叢集的高可用
$ ./bin/kafka-server-start.sh -daemon ./config/server.properties 檢視 topic 是否建立成功
$ bin/kafka-topics.sh --list --zookeeper localhost:2181 nginx 監控 Kafka Manager
Kafka-manager 是 Yahoo 公司開源的叢集管理工具。
可以在 Github 上下載下傳安裝:https://github.com/yahoo/kafka-manager
如果遇到 Kafka 消費不及時的話,可以通過到具體 cluster 頁面上,增加 partition。Kafka 通過 partition 分區來提高并發消費速度。
Logstash
Logstash 提供三大功能
- INPUT 進入
- FILTER 過濾功能
- OUTPUT 出去
如果使用 Filter 功能的話,強烈推薦大家使用 Grok debugger 來預先解析日志格式。
$ wget https://artifacts.elastic.co/downloads/logstash/logstash-6.2.4.tar.gz 解壓重命名
$ tar -zxvf logstash-6.2.4.tar.gz$ mv logstash-6.2.4 logstash 修改 Logstash 配置修改 Logstash 配置,使之提供 indexer 的功能,将資料插入到 Elasticsearch 叢集中
$ vim nginx.conf input { kafka { type => "kafka" bootstrap_servers => "192.168.0.1:2181,192.168.0.2:2181,192.168.0.3:2181" topics => "nginx" group_id => "logstash" consumer_threads => 2 } } output { elasticsearch { host => ["192.168.0.1","192.168.0.2","192.168.0.3"] port => "9300" index => "nginx-%{+YYYY.MM.dd}" } } 啟動 Logstash
$ ./bin/logstash -f nginx.conf Elasticsearch
$ wget https://artifacts.elastic.co/downloads/elasticsearch/elasticsearch-6.2.4.tar.gz $ tar -zxvf elasticsearch-6.2.4.tar.gz$ mv elasticsearch-6.2.4.tar.gz elasticsearch 修改配置
$ vim config/elasticsearch.yml cluster.name: es node.name: es-node1 network.host: 192.168.0.1 discovery.zen.ping.unicast.hosts: ["192.168.0.1"] discovery.zen.minimum_master_nodes: 1 啟動通過 -d 來背景啟動
$ ./bin/elasticsearch -d 打開網頁 http://192.168.0.1:9200/, 如果出現下面資訊說明配置成功
{ name: "es-node1", cluster_name: "es", cluster_uuid: "XvoyA_NYTSSV8pJg0Xb23A", version: { number: "6.2.4", build_hash: "ccec39f", build_date: "2018-04-12T20:37:28.497551Z", build_snapshot: false, lucene_version: "7.2.1", minimum_wire_compatibility_version: "5.6.0", minimum_index_compatibility_version: "5.0.0" }, tagline: "You Know, for Search"} 控制台 Cerebro 這個名字大家可能覺得很陌生,其實過去它的名字叫 kopf !因為 Elasticsearch 5.0 不再支援 site plugin,是以 kopf 作者放棄了原項目,另起爐竈搞了 cerebro,以獨立的單頁應用形式,繼續支援新版本下 Elasticsearch 的管理工作。 
注意點
- Master 與 Data 節點分離,當 Data 節點大于 3 個的時候,建議責任分離,減輕壓力
- Data Node 記憶體不超過 32G ,建議設定成 31 G ,具體原因可以看上一篇文章
- discovery.zen.minimum_master_nodes 設定成 ( total / 2 + 1 ),避免腦裂情況
- 最重要的一點,不要将 ES 暴露在公網中,建議都安裝 X-PACK ,來加強其安全性
kibana
$ wget https://artifacts.elastic.co/downloads/kibana/kibana-6.2.4-darwin-x86_64.tar.gz $ tar -zxvf kibana-6.2.4-darwin-x86_64.tar.gz$ mv kibana-6.2.4-darwin-x86_64.tar.gz kibana $ vim config/kibana.yml server.port: 5601 server.host: "192.168.0.1" elasticsearch.url: "http://192.168.0.1:9200" 啟動 Kibana
$ nohup ./bin/kibana & 界面展示
建立索引頁面需要到 Management -> Index Patterns 中通過字首來指定
最終效果展示