1.1 GlusterFS簡介
GlusterFS是一個開源的分布式檔案系統。
由存儲伺服器、用戶端以及NFS/Samba存儲網關(可選,根據需要選擇使用)組成。
沒有中繼資料伺服器元件,這有助于提升整個系統的性能、可靠性和穩定性。
傳統的分布式檔案系統大多通過元伺服器來存儲中繼資料,中繼資料包含存儲節點上的目錄資訊、目錄結構等。這樣的設計在浏覽目錄時效率高,但是也存在一些缺陷,例如單點故障。一旦中繼資料伺服器出現故障,即使節點具備再高的備援性,整個存儲系統也将崩潰。而GlusterFS分布式檔案系統是基于無元伺服器的設計,資料橫向擴充能力強,具備較高的可靠性及存儲效率。
GlusterFs同時也是Scale-Out(橫向擴充)存儲解決方案Gluster的核心,在存儲資料方面具有強大的橫向擴充能力,通過擴充能夠支援數PB存儲容量和處理數千用戶端。
GlusterFS支援借助TCP/IP或InfiniBandRDMA網絡 (一種支援多并發連結的技術,具有高帶寬、低延遲時間、高擴充性的特點)将實體分散分布的存儲資源彙聚在一起,統一提供存儲服務,并使用統一全局命名空間來管理資料。
1.2 GlusterFS的特點
(一)擴充性和高性能
GlusterFs利用雙重特性來提供高容量存儲解決方案。
Scale-Out架構允許通過簡單地增加存儲節點的方式來提高存儲容量和性能(磁盤、計算和I/0資源都可以獨立增加),支援10GbE和InfiniBand 等高速網絡互聯。
Gluster彈性哈希(ElasticHash) 解決了GlusterFS對中繼資料伺服器的依賴,改善了單點故障和性能瓶頸,真正實作了并行化資料通路。GlusterFS采用彈性雜湊演算法在存儲池中可以智能地定位任意資料分片(将資料分片存儲在不同節點上),不需要檢視索引或者向中繼資料伺服器查詢。
(二)高可用性
GlusterFS可以對檔案進行自動複制,如鏡像或多次複制,進而確定資料總是可以通路,甚至是在硬體故障的情況下也能正常通路當資料出現不一緻時,自我修複功能能夠把資料恢複到正确的狀态,資料的修複是以增量的方式在背景執行,幾乎不會産生性能負載。
GlusterFS可以支援所有的存儲,因為它沒有設計自己的私有資料檔案格式,而是采用作業系統中主流标準的磁盤檔案系統( 如EXT3、XFS等)來存儲檔案,是以資料可以使用傳統通路磁盤的方式被通路。
分布式存儲中,将所有節點的命名空間整合為統一命名空間,将整個系統的所有節點的存儲容量組成一個大的虛拟存儲池,供前端主機通路這些節點完成資料讀寫操作。
(四)彈性卷管理
邏輯存儲池可以線上進行增加和移除,不會導緻業務中斷。邏輯卷可以根據需求線上增長和縮減,并可以在多個節點中實作負載均衡。
檔案系統配置也可以實時線上進行更改并應用,進而可以适應工作負載條件變化或線上性能調優。
(五)基于标準協定
Gluster存儲服務支援NFS、CIFS、 HTTP、 FTP、 SMB及Gluster原生協定,完全與POSIX 标準( 可移植作業系統接口)相容。
現有應用程式不需要做任何修改就可以對Gluster中的資料進行通路,也可以使用專用API進行通路。
2.1 Brick(存儲塊)
指可信主機池中由主機提供的用于實體存儲的專用分區,是GlusterFS中的基本存儲單元,同時也是可信存儲池中伺服器上對外提存儲目錄。
2.2 Volume(邏輯卷)
一個邏輯卷是一組Brick的集合。卷是資料存儲的邏輯裝置,類似于LVM 中的邏輯卷。大部分Gluster管理操作是在卷上進行的。
是一個核心子產品,允許使用者建立自己的檔案系統,無須修改核心代碼。
2.4 VFS
核心空間對使用者空間提供的通路磁盤的接口。
2.5 Glusterd(背景管理程序)
在存儲群集中的每個節點上都要運作。
用戶端或應用程式通過GlusterFS的挂載點通路資料。
linux系統核心通過VFS API收到請求并處理。
GlusterFS client 收到資料後,client 根據配置檔案的配置對資料進行處理。
經過GlusterFS client處理後,通過網絡将資料傳遞至遠端的GlusterFS Server,并且将資料寫入到伺服器儲存設備上。
4.1 彈性HASH算法概述
彈性HASH算法是Davies-Meyer 算法的具體實作,通過HASH 算法可以得到一個32位的整數範圍的hash 值,假設邏輯卷中有N個存儲機關Brick, 則32位的整數範圍将被劃分為N個連續的子空間,每個空間對應一個Brick。當使用者或應用程式通路某一個命名空間時,通過對該命名空間計算HASH值,根據該HASH 值所對應的32位整數空間定位資料所在的Brick。
4.2 彈性HASH算法的優點
解決了對中繼資料伺服器的依賴,進而解決了單點故障以及通路瓶頸。
GlusterFs支援七種卷,即分布式卷、條帶卷、複制卷、分布式條帶卷、分布式複制卷、條帶複制卷和分布式條帶複制卷。
5.1 分布式卷
1)分布式卷的介紹
檔案通過HASH算法分布到所有Brick Server. 上,這種卷是GlusterFS 的預設卷;以檔案為機關根據HASH算法散列到不同的Brick,其實隻是擴大了磁盤空間,如果有一塊磁盤損壞,資料也将丢失,屬于檔案級的RAIDO,不具有容錯能力。
在該模式下,并沒有對檔案進行分塊處理,檔案直接存儲在某個Server節點上。
由于直接使用本地檔案系統進行檔案存儲,是以存取效率并沒有提高,反而會因為網絡通信的原因而有所降低。
示例:
File1 和File2存放在Server1, 而File3存放在Server2,檔案都是随機存儲,一個檔案(如File1)要麼在Server1上,要麼在Server2. 上,不能分塊同時存放在Server1和Server2上。
2)分布式卷具有如下特點:
檔案分布在不同的伺服器,不具備備援性。
更容易和廉價地擴"展卷的大小。
單點故障會造成資料丢失。
依賴底層的資料保護。
#建立一個名為dis-volume的分布式卷,檔案将根據HASH分布在server1 : /dir1、server2:/dir2 和server3:/dir3中.
gluster volume create dis-volume server1:/dir1 server2:/dir2 server3:/dir3
5.2 條帶卷
1)條帶卷的介紹
類似RAID0,檔案被分成資料塊并以輪詢的方式分布到多個BrickServer上,檔案存儲以資料塊為機關,支援大檔案存儲,檔案越大,讀取效率越高,但是不具備備援性。
#示例原理:
File 被分割為6段,1、3、5放在Server1, 2、4、6放在Server2。
2)條帶卷特點
資料被分割成更小塊分布到塊伺服器群中的不同條帶區。
分布減少了負載且更小的檔案加速了存取的速度。
沒有資料備援。
#建立了一個名為stripe-volume的條帶卷,檔案将被分塊輪詢的存儲在Server1 :/dir1和Server2:/dir2兩個Brick中
gluster volume create stripe-volume stripe 2 transport tcp server1:/dir1 server2:/dir2
5.3 複制卷
1)複制卷的介紹
将檔案同步到多個Brick 上,使其具備多個檔案副本,屬于檔案級RAID 1,具有容錯能力。因為資料分散在多個Brick 中,是以讀性能得到很大提升,但寫性能下降。
複制卷具備備援性,即使一個節點損壞,也不影響資料的正常使用。但因為要儲存副本,是以磁盤使用率較低。
#建立名為rep-volume的複制卷,檔案将同時存儲兩個副本,分别在Server1:/dir1和Server2:/dir2兩個Brick中
gluster volume create rep-volume replica 2 transport tcp server1:/dir1 server2:/dir2
5.4 分布式條帶卷
1)分布式條帶卷的介紹
BrickServer數量是條帶數(資料塊分布的Brick數量)的倍數,兼具分布式卷和條帶卷的特點。
主要用于大檔案通路處理,建立一個分布式條帶卷最少需要4台伺服器。
Filel和File2通過分布式卷的功能分别定位到Server1和Server2。
在Server1中,File1被分割成4段,其中 1、3在Server1中的exp1 目錄中,2、4在Server1中的exp2 目錄中。
在Server2中,File2 也被分割成4段,其中1、3在 Server2中的exp3目錄中,2、4在Server2 中的exp4目錄中。
#建立一個名為dis-stripe的分布式條帶卷,配置分布式的條帶卷時,卷中Brick所包含的存儲伺服器數必須是條帶數的倍數(>=2倍)。
Brick的數量是4 ( Server1:/dir1、 Server2: /dir2、 Server3:/dir3 和Server4:/dir4),條帶數為2 (stripe 2 )
gluster volume create dis-stripe stripe 2 transport tcp server1:/dir1 server2:/dir2 server3:/dir3 server4:/dir4
建立卷時,存儲伺服器的數量如果等于條帶或複制數,那麼建立的是條帶卷或者複制卷;如果存儲伺服器的數量是條帶或複制數的2倍甚至更多,那麼将建立的是分布式條帶卷或分布式複制卷。
5.5 分布式複制卷
1)分布式複制卷的介紹
File1和File2 通過分布式卷的功能分别定位到Server1 和Server2。
在存放File1 時,File1 根據複制卷的特性,将存在兩個相同的副本,分别是Server1 中的exp1 目錄和Server2 中的exp2目錄。
在存放File2時,File2 根據複制卷的特性,也将存在兩個相同的副本,分别是Server3 中的exp3 目錄和Server4 中的exp4 目錄。
#建立一個名為dis-rep的分布式條帶卷,配置分布式的複制卷時,卷中Brick所包含的存儲伺服器數必須是複制數的倍數(>=2倍)。
Brick 的數量是4 (Server1:/dir1、 Server2:/dir2、 Server3:/dir3 和Server4:/dir4),複制數為2 (replica 2)
gluster volume create dis-rep replica 2 transport tcp server1:/dir1 server2: /dir2 server3:/dir3 server4:/dir4
5.6 條帶複制卷
1)條帶複制卷的介紹
類似RAID10,同時具有條帶卷和複制卷的特點。
5.7 分布式條帶複制卷
三種基本卷的複合卷,通常用于類Map Reduce 應用。
1.環境準備工作:
伺服器類型 系統和IP位址 需要安裝的元件
node1伺服器 CentOS7.4(64 位) 192.168.80.10 添加4塊20G硬碟
node2伺服器 CentOS7.4(64 位) 192.168.80.20 添加4塊20G硬碟
node3伺服器 CentOS7.4(64 位) 192.168.80.30 添加4塊20G硬碟
node4伺服器 CentOS7.4(64 位) 192.168.80.40 添加4塊20G硬碟
2.關閉所有節點伺服器的防火牆和SElinux
systemctl stop firewalld
systemctl disable firewalld
setenforce 0
systemctl status firewalld.service
3.由于節點伺服器的操作都一樣,這裡我僅展示node1的操作步驟
① 編寫腳本
[root@node1 ~] # vim /opt/fdisk.sh
#!/bin/bash
NEWDEV=`ls /dev/sd* | grep -o 'sd[b-z]' | uniq`
do
echo -e "n\np\n\n\n\nw\n" | fdisk /dev/$VAR &> /dev/null
mkfs.xfs /dev/${VAR}"1" &> /dev/null
mkdir -p /data/${VAR}"1" &> /dev/null
echo "/dev/${VAR}"1" /data/${VAR}"1" xfs defaults 0 0" >> /etc/fstab
done
mount -a &> /dev/null
② 執行腳本并檢視磁盤挂載情況
cd /opt/
./fdisk.sh
mount -a
df -h
--------------------------------------------------------------------------------------------------------
檔案系統 容量 已用 可用 已用% 挂載點
... ... ... ... ...
/dev/sdb1 20G 33M 20G 1% /data/sdb1
/dev/sdc1 20G 33M 20G 1% /data/sdc1
/dev/sdd1 20G 33M 20G 1% /data/sdd1
/dev/sde1 20G 33M 20G 1% /data/sde1
③ 添加臨時DNS域名解析
echo "192.168.80.20 node2" >> /etc/hosts
echo "192.168.80.30 node3" >> /etc/hosts
echo "192.168.80.40 node4" >> /etc/hosts
cat /etc/hosts
④ 放入gfsrepo.zip安裝包解壓,然後建立glfs.repo配置檔案
unzip gfsrepo.zip
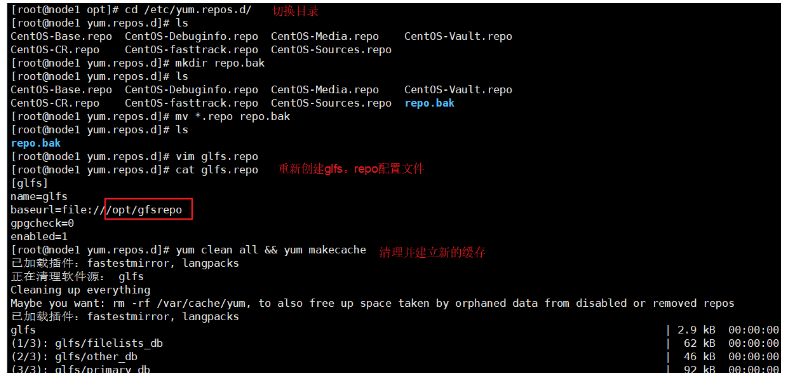
cd /etc/yum.repos.d/
mv * repos.bak/
mv: 無法将目錄"repos.bak" 移動至自身的子目錄"repos.bak/repos.bak" 下
[root@node1 /etc/yum.repos.d] # ls
repos.bak
[root@node1 /etc/yum.repos.d] # vim glfs.repo #建立glfs.repo配置檔案内容如下
[glfs]
name=glfs
baseurl=file:///opt/gfsrepo
gpgcheck=0
enabled=1
yum clean all && yum makecache
⑤ 安裝gfs相關程式,然後開啟服務。
yum -y install glusterfs glusterfs-server glusterfs-fuse glusterfs-rdma
systemctl start glusterd.service
systemctl enable glusterd.service
systemctl status glusterd.service
4.建立叢集
[root@node1 yum.repos.d]# gluster peer probe node1 #添加node1
peer probe: success. Probe on localhost not needed
[root@node1 yum.repos.d]# gluster peer probe node2 #添加node2
peer probe: success.
[root@node1 yum.repos.d]# gluster peer probe node3 #添加node3
[root@node1 yum.repos.d]# gluster peer probe node4 #添加node4
[root@node1 yum.repos.d]# gluster peer status #檢視狀态
Number of Peers: 3
Hostname: node2
Uuid: ac9137b9-8ca5-43a1-8e4c-5af058fedc4e
State: Peer in Cluster (Connected)
Hostname: node3
Uuid: 4816542a-2425-4ccb-83e5-ee08e0fd0188
Hostname: node4
Uuid: 87dfb325-b90a-4a8c-9204-8013754ba49b
要求如下:
卷名稱 卷類型 Brick
dis-volume 分布式卷 node1(/data/sdb1)、node2(/data/sdb1)
stripe-volume 條帶卷 node1(/data/sdc1)、node2(/data/sdc1)
rep-volume 複制卷 node3(/data/sdb1)、node4(/data/sdb1)
dis-stripe 分布式條帶卷 node1(/data/sdd1)、node2(/data/sdd1)、node3(/data/sdd1)、node4(/data/sdd1)
dis-rep 分布式複制卷 node1(/data/sde1)、node2(/data/sde1)、node3(/data/sde1)、node4(/data/sde1)
7.1 建立分布式卷
建立分布式卷,沒有指定類型,預設建立的是分布式卷
[root@node1 yum.repos.d]# gluster volume create dis-volume node1:/data/sdb1 node2:/data/sdb1 force
volume create: dis-volume: success: please start the volume to access data
dis-volume
[root@node1 yum.repos.d]# gluster volume start dis-volume
volume start: dis-volume: success
[root@node1 yum.repos.d]# gluster volume info dis-volume
Volume Name: dis-volume
Type: Distribute
Volume ID: 057d9ba4-800d-477b-904b-e43f136e4297
Status: Started
Snapshot Count: 0
Transport-type: tcp
Bricks:
Brick1: node1:/data/sdb1
Brick2: node2:/data/sdb1
Options Reconfigured:
transport.address-family: inet
nfs.disable: on

7.2 建立條帶卷
指定類型為 stripe,數值為 2,且後面跟了 2 個 Brick Server,是以建立的是條帶卷
[root@node1 yum.repos.d]# gluster volume create stripe-volume stripe 2 node1:/data/sdc1 node2:/data/sdc1 force
volume create: stripe-volume: success: please start the volume to access data
[root@node1 yum.repos.d]# gluster volume start stripe-volume
volume start: stripe-volume: success
[root@node1 yum.repos.d]# gluster volume info stripe-volume
Volume Name: stripe-volume
Type: Stripe
Volume ID: ab23d1af-941e-4310-842b-2b4c4c89e50d
Number of Bricks: 1 x 2 = 2
Brick1: node1:/data/sdc1
Brick2: node2:/data/sdc1
7.3 建立複制卷
指定類型為 replica,數值為 2,且後面跟了 2 個 Brick Server,是以建立的是複制卷
[root@node1 yum.repos.d]# gluster volume create rep-volume replica 2 node3:/data/sdb1 node4:/data/sdb1 force
volume create: rep-volume: success: please start the volume to access data
[root@node1 yum.repos.d]# gluster volume start rep-volume
volume start: rep-volume: success
[root@node1 yum.repos.d]# gluster volume info rep-volume
Volume Name: rep-volume
Type: Replicate
Volume ID: d511d0f1-e61f-4b43-8d59-354071846e9f
Brick1: node3:/data/sdb1
Brick2: node4:/data/sdb1
7.4 建立分布式條帶卷
指定類型為 stripe,數值為 2,而且後面跟了 4 個 Brick Server,是 2 的兩倍,是以建立的是分布式條帶卷
[root@node1 yum.repos.d]# gluster volume create dis-stripe stripe 2 node1:/data/sdd1 node2:/data/sdd1 node3:/data/sdd1 node4:/data/sdd1 force
volume create: dis-stripe: success: please start the volume to access data
[root@node1 yum.repos.d]# gluster volume start dis-stripe
volume start: dis-stripe: success
[root@node1 yum.repos.d]# gluster volume info dis-stripe
Volume Name: dis-stripe
Type: Distributed-Stripe
Volume ID: 9ac553dd-ae1a-447b-8fab-e502003adb17
Number of Bricks: 2 x 2 = 4
Brick1: node1:/data/sdd1
Brick2: node2:/data/sdd1
Brick3: node3:/data/sdd1
Brick4: node4:/data/sdd1
7.5 建立分布式複制卷
指定類型為 replica,數值為 2,而且後面跟了 4 個 Brick Server,是 2 的兩倍,是以建立的是分布式複制卷
[root@node1 yum.repos.d]# gluster volume create dis-rep replica 2 node1:/data/sde1 node2:/data/sde1 node3:/data/sde1 node4:/data/sde1 force
volume create: dis-rep: success: please start the volume to access data
[root@node1 yum.repos.d]# gluster volume start dis-rep
volume start: dis-rep: success
[root@node1 yum.repos.d]# gluster volume info dis-rep
Volume Name: dis-rep
Type: Distributed-Replicate
Volume ID: c6576656-f6c6-4eb1-a96c-ad8c12daf624
Brick1: node1:/data/sde1
Brick2: node2:/data/sde1
Brick3: node3:/data/sde1
[root@node1 yum.repos.d]# gluster volume list
dis-rep
dis-stripe
rep-volume
stripe-volume
8.1 部署用戶端并建立測試檔案的步驟
1.關閉防火牆和SElinux
[root@client ~]# systemctl stop firewalld
[root@client ~]# systemctl disable firewalld
[root@client ~]# systemctl status firewalld.service
2.放入壓縮包并解壓
[root@client ~]# cd /opt/
[root@client opt]# ls
3.備份之前的本地yum源,建立glfs源
[root@client opt]# cd /etc/yum.repos.d/
[root@client yum.repos.d]# ls
local.repo repo.bak
[root@client yum.repos.d]# vim glfs.repo
[root@client yum.repos.d]# yum clean all && yum makecache
[root@client yum.repos.d]# yum -y install glusterfs glusterfs-fuse
4.建立目錄(用于後面挂載),添加DNF臨時域名解析
[root@client yum.repos.d]# mkdir -p /test/{dis,stripe,rep,dis_stripe,dis_rep}
[root@client yum.repos.d]# ls /test/
dis dis_rep dis_stripe rep stripe
[root@client yum.repos.d]# echo "192.168.80.10 node1" >> /etc/hosts
[root@client yum.repos.d]# echo "192.168.80.20 node2" >> /etc/hosts
[root@client yum.repos.d]# echo "192.168.80.30 node3" >> /etc/hosts
[root@client yum.repos.d]# echo "192.168.80.40 node4" >> /etc/hosts
[root@client yum.repos.d]# cat /etc/hosts
127.0.0.1 localhost localhost.localdomain localhost4 localhost4.localdomain4
::1 localhost localhost.localdomain localhost6 localhost6.localdomain6
192.168.80.10 node1
192.168.80.20 node2
192.168.80.30 node3
192.168.80.40 node4
5.挂載之前建立的卷
[root@client yum.repos.d]# mount.glusterfs node1:dis-volume /test/dis
[root@client yum.repos.d]# mount.glusterfs node1:stripe-volume /test/stripe
[root@client yum.repos.d]# mount.glusterfs node1:rep-volume /test/rep
[root@client yum.repos.d]# mount.glusterfs node1:dis-stripe /test/dis_stripe
[root@client yum.repos.d]# mount.glusterfs node1:dis-rep /test/dis_rep
[root@client yum.repos.d]# df -h
.... ... .... .... ....
node1:dis-volume 40G 65M 40G 1% /test/dis
node1:stripe-volume 40G 65M 40G 1% /test/stripe
node1:rep-volume 20G 33M 20G 1% /test/rep
node1:dis-stripe 80G 130M 80G 1% /test/dis_stripe
node1:dis-rep 40G 65M 40G 1% /test/dis_rep
[root@client yum.repos.d]#
6.使用dd指令從/dev/zero檔案中複制40M的資料到測試檔案中
[root@client yum.repos.d]# dd if=/dev/zero of=/opt/demo1.log bs=1M count=40
記錄了40+0 的讀入
記錄了40+0 的寫出
41943040位元組(42 MB)已複制,0.0604672 秒,694 MB/秒
[root@client yum.repos.d]# dd if=/dev/zero of=/opt/demo2.log bs=1M count=40
41943040位元組(42 MB)已複制,0.0578344 秒,725 MB/秒
[root@client yum.repos.d]# dd if=/dev/zero of=/opt/demo3.log bs=1M count=40
41943040位元組(42 MB)已複制,0.0615882 秒,681 MB/秒
[root@client yum.repos.d]# dd if=/dev/zero of=/opt/demo4.log bs=1M count=40
41943040位元組(42 MB)已複制,0.0554032 秒,757 MB/秒
[root@client yum.repos.d]# dd if=/dev/zero of=/opt/demo5.log bs=1M count=40
41943040位元組(42 MB)已複制,0.0593443 秒,707 MB/秒
[root@client yum.repos.d]# ls -lh /opt/
總用量 250M
-rw-r--r--. 1 root root 40M 7月 25 00:57 demo1.log
-rw-r--r--. 1 root root 40M 7月 25 00:57 demo2.log
-rw-r--r--. 1 root root 40M 7月 25 00:57 demo3.log
-rw-r--r--. 1 root root 40M 7月 25 00:57 demo4.log
-rw-r--r--. 1 root root 40M 7月 25 00:57 demo5.log
drwxr-xr-x. 3 root root 8.0K 3月 27 2018 gfsrepo
-rw-r--r--. 1 root root 50M 7月 25 00:44 gfsrepo.zip
drwxr-xr-x. 2 root root 6 3月 26 2015 rh
7.将測試檔案分别複制到各個卷中
[root@client yum.repos.d]# cp /opt/demo* /test/dis
[root@client yum.repos.d]# cp /opt/demo* /test/stripe/
[root@client yum.repos.d]# cp /opt/demo* /test/rep/
[root@client yum.repos.d]# cp /opt/demo* /test/dis_stripe/
[root@client yum.repos.d]# cp /opt/demo* /test/dis_rep/
8.2 部署用戶端并建立測試檔案的具體操作步驟
3.備份之前的本地yum源,建立glfs源,安裝相關程式
1.檢視分布式檔案分布(node1:/dev/sdb1、node2:/dev/sdb1)
總用量 160M
-rw-r--r--. 2 root root 40M 7月 25 00:59 demo1.log
-rw-r--r--. 2 root root 40M 7月 25 00:59 demo2.log
-rw-r--r--. 2 root root 40M 7月 25 00:59 demo3.log
---------------------------------------------------
[root@node2 ~]# ls -lh /data/sdb1
總用量 40M
-rw-r--r--. 2 root root 40M 7月 25 00:59 demo5.log
2.檢視條帶卷檔案分布(node1:/dev/sdc1、node2:/dev/sdc1)
[root@node1 ~] # ls -lh /data/sdc1
總用量 100M
-rw-r--r--. 2 root root 20M 3月 2 22:46 demo1.log
-rw-r--r--. 2 root root 20M 3月 2 22:46 demo2.log
-rw-r--r--. 2 root root 20M 3月 2 22:46 demo3.log
-rw-r--r--. 2 root root 20M 3月 2 22:46 demo4.log
-rw-r--r--. 2 root root 20M 3月 2 22:46 demo5.log
[root@node2 ~]#ll -h /data/sdc1
3.檢視複制卷檔案分布(node3:/dev/sdb1、node4:/dev/sdb1)
[root@node3 ~]#ll -h /data/sdb1
總用量 200M
-rw-r--r--. 2 root root 40M 3月 2 22:46 demo1.log
-rw-r--r--. 2 root root 40M 3月 2 22:46 demo2.log
-rw-r--r--. 2 root root 40M 3月 2 22:46 demo3.log
-rw-r--r--. 2 root root 40M 3月 2 22:46 demo4.log
-rw-r--r--. 2 root root 40M 3月 2 22:46 demo5.log
[root@node4 ~]#ll -h /data/sdb1
4.檢視分布式條帶卷分布(node1:/dev/sdd1、node2:/dev/sdd1、node3:/dev/sdd1、node4:/dev/sdd1)
[root@node1 ~] # ll -h /data/sdd1
總用量 60M
[root@node2 ~]#ll -h /data/sdd1
[root@node3 ~]#ll -h /data/sdd1
[root@node4 ~]#ll -h /data/sdd1
5.檢視分布式複制卷分布(node1:/dev/sde1、node2:/dev/sde1、node3:/dev/sde1、node4:/dev/sde1)
[root@node1 ~] # ll -h /data/sde1
[root@node2 ~]#ll -h /data/sde1
[root@node3 ~]#ll -h /data/sde1
[root@node4 ~]#ll -h /data/sde1
1.分布式卷資料檢視,缺少demo5,這是在node2上的,不具備備援
挂起 node2 節點或者關閉glusterd服務來模拟故障
[root@node2 ~]# init 0
[root@client ~]# ll /test/dis
總用量 163840
-rw-r--r--. 1 root root 41943040 7月 25 00:59 demo1.log
-rw-r--r--. 1 root root 41943040 7月 25 00:59 demo2.log
-rw-r--r--. 1 root root 41943040 7月 25 00:59 demo3.log
-rw-r--r--. 1 root root 41943040 7月 25 00:59 demo4.log
2、條帶卷,資料都沒了,不具備備援
[root@client ~]# ll /test/stripe/
總用量 0
[root@client ~]#
3.複制卷,在node3和node4上的,關閉node4進行測試,具有備援
[root@node4 ~]#init 0
用戶端所有資料仍然存在
[root@client ~]# ll /test/rep/
總用量 204800
-rw-r--r--. 1 root root 41943040 7月 25 00:59 demo5.log
4.分布式條帶卷,不具備備援
[root@client ~]# ll /test/dis_stripe/
5.分布式複制卷,具有備援
[root@client ~]# ll /test/dis_rep/
-rw-r--r--. 1 root root 41943040 7月 25 01:01 demo1.log
-rw-r--r--. 1 root root 41943040 7月 25 01:01 demo2.log
-rw-r--r--. 1 root root 41943040 7月 25 01:01 demo3.log
-rw-r--r--. 1 root root 41943040 7月 25 01:01 demo4.log
-rw-r--r--. 1 root root 41943040 7月 25 01:01 demo5.log
1.檢視GlusterFS卷
gluster volume list
2.檢視所有卷的資訊
gluster volume info
3.檢視所有卷的狀态
gluster volume status
4.停止一個卷
gluster volume stop dis-stripe
5.删除一個卷,注意:删除卷時,需要先停止卷,且信任池中不能有主機處于當機狀态,否則删除不成功
gluster volume delete dis-stripe
6.設定卷的通路控制
#僅拒絕
gluster volume set dis-rep auth.allow 192.168.80.100
允許
gluster volume set dis-rep auth.allow 192.168.80.* #設定192.168.80.0網段的所有IP位址都能通路dis-rep卷(分布式複制卷)