晚上好~今天繼續給大家分享一下第二個重要的感應器,其實擷取方向本應該很簡單的事情,在文章一中看到 有個TYPE_ORIENTATION 關鍵字,說明可以直接擷取裝置的移動方向,但是最新版的SDK加上了這麼一句話“TYPE_ORIENTATION This constant is deprecated. use SensorManager.getOrientation() instead. ”也就是說,這種方式已經被取消,要開發者使用 SensorManager.getOrientation()來擷取原來的資料。
實際上,android擷取方向是通過磁場感應器和加速度感應器共同獲得的,至于具體的算法SDK已經封裝好了。也就是說現在擷取使用者方向有兩種方式,一是官方推薦的,通過SensorManager.getOrientation()來擷取,這個方法表面看似容易(那是因為你還沒看到他的參數。。一會再說),但實際上需要用到兩個感應器共同完成工作,特點是更加的準确。第二種方法非常簡單,就像前一篇文章擷取加速度一樣,直接得到三個軸上的資料。
額,從難一些的介紹吧,因為畢竟第一種方法會是android未來的一個選擇,第二種不知道什麼時候就要成為曆史了。
android給我們提供的方向資料是一個float型的數組,包含三個方向的值 如圖
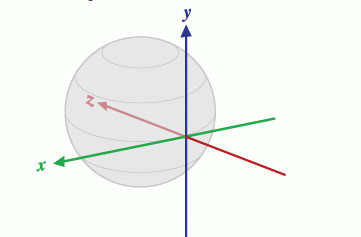
當你的手機水準放置時,被預設為靜置狀态,即XY角度均為0
values[0] 表示Z軸的角度:方向角,我們平時判斷的東西南北就是看這個資料的,經過我的實驗,發現了一個有意思的事情,也就是說使用第一種方式獲得方向(磁場+加速度)得到的資料範圍是(-180~180),也就是說,0表示正北,90表示正東,180/-180表示正南,-90表示正西。而第二種方式(直接通過方向感應器)資料範圍是(0~360)360/0表示正北,90表示正東,180表示正南,270表示正西。
values[1] 表示X軸的角度:俯仰角 即由靜止狀态開始,前後翻轉
values[2] 表示Y軸的角度:翻轉角 即由靜止狀态開始,左右翻轉
可見統一擷取方向的方法是必須的,因為處理這些資料的算法可能針對第一種擷取方式,那麼當用在第二種方式時,移植性就不好了。
看下面的方法
--------------------------------------------------------------------------------------------------------------------------------------------------------------------------------------------------------------------------------------
Computes the device's orientation based on the rotation matrix.
When it returns, the array values is filled with the result:
values[0]: azimuth, rotation around the Z axis.
values[1]: pitch, rotation around the X axis.
values[2]: roll, rotation around the Y axis.
The reference coordinate-system used is different from the world coordinate-system defined for the rotation matrix:
X is defined as the vector product Y.Z (It is tangential to the ground at the device's current location and roughly points West).
Y is tangential to the ground at the device's current location and points towards the magnetic North Pole.
Z points towards the center of the Earth and is perpendicular to the ground.
All three angles above are in radians and positive in the counter-clockwise direction.
通常我們并不需要擷取這個函數的傳回值,這個方法會根據參數R[]的資料填充values[]而後者就是我們想要的。
那麼R表示什麼呢?又将怎麼擷取呢?
R[] 是一個旋轉矩陣,用來儲存磁場和加速度的資料,大家可以了解未加工的方向資料吧
R通過下面的靜态方法擷取,這個方法也是用來填充R[]
解釋以下參數,第一個就是我們需要填充的R數組,大小是9
第二個是是一個轉換矩陣,将磁場資料轉換進實際的重力坐标中 一般預設情況下可以設定為null
第三個是一個大小為3的數組,表示從加速度感應器擷取來的資料 在onSensorChanged中
第四個是一個大小為3的數組,表示從磁場感應器擷取來的資料 在onSensorChanged中
好了基本邏輯就是這樣的,下面給大家示範一個簡單的測試方向的例子,可以時刻監聽使用者的方向
/*
* @author octobershiner
* 2011 07 28
* SE.HIT
* 一個示範通過磁場和加速度兩個感應器擷取方向資料的例子
* */
package uni.sensor;
import android.app.Activity;
import android.content.Context;
import android.hardware.Sensor;
import android.hardware.SensorEvent;
import android.hardware.SensorEventListener;
import android.hardware.SensorManager;
import android.os.Bundle;
import android.util.Log;
public class OrientationActivity extends Activity{
private SensorManager sm;
//需要兩個Sensor
private Sensor aSensor;
private Sensor mSensor;
float[] accelerometerValues = new float[3];
float[] magneticFieldValues = new float[3];
private static final String TAG = "sensor";
@Override
public void onCreate(Bundle savedInstanceState) {
// TODO Auto-generated method stub
super.onCreate(savedInstanceState);
setContentView(R.layout.main);
sm = (SensorManager)getSystemService(Context.SENSOR_SERVICE);
aSensor = sm.getDefaultSensor(Sensor.TYPE_ACCELEROMETER);
mSensor = sm.getDefaultSensor(Sensor.TYPE_MAGNETIC_FIELD);
sm.registerListener(myListener, aSensor, SensorManager.SENSOR_DELAY_NORMAL);
sm.registerListener(myListener, mSensor,SensorManager.SENSOR_DELAY_NORMAL);
//更新顯示資料的方法
calculateOrientation();
}
//再次強調:注意activity暫停的時候釋放
public void onPause(){
sm.unregisterListener(myListener);
super.onPause();
}
final SensorEventListener myListener = new SensorEventListener() {
public void onSensorChanged(SensorEvent sensorEvent) {
if (sensorEvent.sensor.getType() == Sensor.TYPE_MAGNETIC_FIELD)
magneticFieldValues = sensorEvent.values;
if (sensorEvent.sensor.getType() == Sensor.TYPE_ACCELEROMETER)
accelerometerValues = sensorEvent.values;
calculateOrientation();
public void onAccuracyChanged(Sensor sensor, int accuracy) {}
};
private void calculateOrientation() {
float[] values = new float[3];
float[] R = new float[9];
SensorManager.getRotationMatrix(R, null, accelerometerValues, magneticFieldValues);
SensorManager.getOrientation(R, values);
// 要經過一次資料格式的轉換,轉換為度
values[0] = (float) Math.toDegrees(values[0]);
Log.i(TAG, values[0]+"");
//values[1] = (float) Math.toDegrees(values[1]);
//values[2] = (float) Math.toDegrees(values[2]);
if(values[0] >= -5 && values[0] < 5){
Log.i(TAG, "正北");
}
else if(values[0] >= 5 && values[0] < 85){
Log.i(TAG, "東北");
else if(values[0] >= 85 && values[0] <=95){
Log.i(TAG, "正東");
else if(values[0] >= 95 && values[0] <175){
Log.i(TAG, "東南");
else if((values[0] >= 175 && values[0] <= 180) || (values[0]) >= -180 && values[0] < -175){
Log.i(TAG, "正南");
else if(values[0] >= -175 && values[0] <-95){
Log.i(TAG, "西南");
else if(values[0] >= -95 && values[0] < -85){
Log.i(TAG, "正西");
else if(values[0] >= -85 && values[0] <-5){
Log.i(TAG, "西北");
}
}
隻要把其中的兩個Sensor。TYPE_ACCELEROMETER改成 Sensor.TYPE_ORIENTATIO就好了,但是今天分享的方法大家最好掌握,這應該是未來android的标準。
Sensor感應器應該就先暫時介紹到這裡吧,該看一下程序線程的東西了,其實hardware包中還有個非常重要的類,Camera攝像頭,相信大家也聽過android掃描器,很強大。以後有時間和大家分享吧。
接下來的安排 應該是 線程 activity然後是geocode
話說我也沒有個指導老師,一個人對着SDK研究這些,有些累阿~求高人指點。
![Windows指令行使用Git下的Curl指令[圖]](data:image/gif;base64,R0lGODlhAQABAIAAAP///wAAACwAAAAAAQABAAACAkQBADs=)