<a href="http://www.codeproject.com/KB/COM/CompleteActiveX/MyActiveX.zip">Download demo project - 231 Kb</a>
ActiveX is a Microsoft technology developed in the mid 90’s, that allows for the creation of applet-like applications that can be downloaded and run within Microsoft's Web browser. This article is intended for Visual C++ developers who are trying to learn how to develop their first ActiveX control for a web application but finding it difficult. While trying to learn this technology myself, I found much of the information available on ActiveX was either no longer available, out of date, or missing critical information, making it extremely difficult for me to create an ActiveX control necessary for my development project. This article is intended to help you get up to speed quickly with developing an ActiveX control. It will show you the basic concepts you need to know about ActiveX, such as methods, properties, and events, and how to communicate between an ActiveX control and a web page. You will learn how to implement the control for use with default security settings in Internet Explorer on Windows XP, without getting unsigned or unsafe control warning messages.
For this tutorial, we will create an ActiveX control that displays a progress bar animated GIF when the control is loaded as a way to indicate to users that the control is loading and processing information. The control will contain functionality to demonstrate how to pass information between the control and the web page. You will be guided step by step on creating the control using Microsoft Visual Studio 2005.
To create an ActiveX control, use Microsoft Visual Studio 2005 to perform the following steps:
From File menu, select New, then Project.
In the New Project dialog, as shown in Figure 1, under Project types, select Visual C++, MFC. Under Templates, select MFC ActiveX Control.
Name the project MyActiveX; for Location, enter the working folder for the project's source code, and then click the OK button.

Figure 1. New Project Dialog
In the MFC ActiveX Control Wizard dialog, as shown in Figure 2, select Control Settings.
Under Create control based on, select STATIC. We are using a static control, as we are just displaying the output from the control and not accepting input.
Under Additional features, make sure Activates when visible and Flicker-free activation are checked and Has an About box dialog is not checked.
Figure 2. MFC ActiveX Control Wizard Dialog
Click the Finish button to enable the MFC ActiveX Control Wizard to create the project's source code. By default, the wizard creates the project to use MFC in a shared DLL. We need to change this since the ActiveX control will not run unless the required MFC DLLs are already installed on the system where the control is being downloaded and run. This is one of the causes of a red X displayed where an ActiveX control should be on a web page. From the Visual Studio menu, select Project, Properties. Navigate to Configuration Properties, General. Change the entry “Use of MFC” to “Use MFC in a Static Library”.
The wizard has created the following three classes:
<code>CMyActiveXApp</code> – This is the ActiveX application class derived from <code>COleControlModule</code>. It is the base class to derive an OLE control module object that contains the member functions for initialization (<code>InitInstance</code>) and code cleanup (<code>ExitInstance</code>).
<code>CMyActiveXCtrl</code> – This is derived from the base class <code>COleControl</code>. This is where we will implement most of the functionality for our control.
<code>CMyActiveXPropPage</code> – This is derived from the base class <code>COlePropertyPage</code>. It is used to manage the property page dialog for the control. The ActiveX Control Wizard has created a default dialog to serve as a property page for the control.
In order to implement support for displaying a progress bar animated GIF from the ActiveX control, we will use the<code>CPictureEx</code> class presented by Oleg Bykov in a CodeProject article. Refer to the References section for more details. First, add the source files pictureex.cpp and pictureex.h to your project, by selecting the Solution Explorer tab in VS 2005, then right click on the Header Files or Source Files in the source tree, and then Add, Existing Item to select the appropriate source file.
To add an animated GIF resource to the project, we have to work around a defect in Visual Studio 2005 (and VS 2003) that does not allow importing a GIF image file. If you try it, you will get an error reporting that the file is not a valid GIF file. You can work around this defect as follows:
Copy the GIF file ProcessingProgressBar.gif to your project working folder, and rename the file toProcessingProgressBar.gaf with a “gaf” file extension. In Resource View, right click on the resource fileMyActiveX.rc, and select Add Resource. In the Add Resource dialog, press the Import button, and select the fileProcessingProgressBar.gaf. In the Custom Resource Type dialog, enter “GIF” for Resource type, and press OK. This will import the GIF image file into the project. You will find it listed under GIF in Resources. Navigate to this item, and change the control ID from the default of <code>IDR_GIF1</code> to <code>IDR_PROGRESSBAR</code>.
Now, we need to make things right with the image file. First, save the resource file MyActiveX.rc. Navigate to the project working folder, and edit this same resource file with Notepad. Navigate to the line item definition for<code>IDR_PROGRESSBAR</code>, and change the filename in quotes to “ProcessingProgressBar.gif”. Also, change the GIF image filename in the working folder to “ProcessingProgressBar.gif”. From Notepad, save the resource fileMyActiveX.rc. Visual Studio will then report that the file myactivex.rc has been modified outside of Visual Studio, click Yes to reload the file. One more correction needs to be made. Select Solution Explorer, navigate to the item “ProcessingProgressBar.gaf”, and select it. In Properties, select Relative Path, and correct the filename to “ProcessingProgressBar.gif”.
Now, we will add a dialog for the progress bar graphic.
In Resource View, right click on the dialog item in the tree, and select Insert Dialog to create a default dialog.
Delete the OK and Cancel buttons that are not needed, and adjust the size of the dialog to 230 x 40.
Change some of the default properties of the dialog to: Border – None, Style – Child, System Menu – False, Visible – True.
Change the control ID to <code>IDD_MAINDIALOG</code>.
Insert a picture control into the dialog, by selecting the Toolbox tab on the right of Visual Studio, selecting a picture control, and clicking in the dialog. Adjust the size of the control to 200 x 20. Change the control ID to<code>IDC_PROGRESSBAR</code> and the Color property to White.
Create a class for the dialog, by right clicking on the dialog and selecting Add Class. This results in the MFC Class Wizard dialog as shown in Figure 3. Name the class <code>CMainDialog</code>, with the base class <code>CDialog</code>. ClickFinish for the wizard to create the default source files for the class.
Figure 3. MFC Class Wizard – <code>CMainDialog</code>
Now, we add the member variables for the classes. The member variable <code>m_MainDialog</code> is associated with the<code>CMainDialog</code> class, and <code>m_ProgressBar</code> is associated with the progress bar control we added to the main dialog.
Add the member variable <code>m_MainDialog</code> to the class <code>CMyActiveXCtrl</code>. Select Class View, right click on<code>CMyActiveXCtrl</code>, and select Add, Add Variable. Enter <code>CMainDialog</code> for Variable type and <code>m_MainDialog</code> forVariable name, and then press the Finish button.
Similar to the above, add a member variable <code>m_ProgressBar</code> to the class <code>CMainDialog</code>. Enter <code>CPictureEx</code> forVariable type, <code>m_ProgressBar</code> for Variable name, and enable the Control variable checkbox, and make sure<code>IDC_PROGRESSBAR</code> is entered for Control ID. Before clicking on the Finish button, make sure that Variable typeis set to <code>CPictureEx</code> and not changed to <code>CStatic</code>.
Figure 4. Add Member Variable Wizard – <code>m_ProgressBar</code>
Now, we get our hands dirty with adding some code to support drawing the main dialog and the progress bar control.
Select the class <code>CMyActiveXCtrl</code>. In the Properties sheet, select the Messages icon, then <code>WM_CREATE</code>. Select the listbox to the right of <code>WM_CREATE</code>, then <code><Add> OnCreate</code> to add a method for the <code>WM_CREATE</code> message. The wizard will add the <code>OnCreate</code> method to the <code>CMyActiveXCtrl</code> class.
Edit MyActiveXCtrl.cpp, and add the following code to the <code>OnCreate</code> method to create the main dialog:
Add the following code to the <code>OnDraw</code> method to size the main dialog window and fill the background:
Select the class <code>CMainDialog</code>. In the Properties sheet, select the Messages icon, then <code>WM_CREATE</code>. Select the listbox to the right of <code>WM_CREATE</code>, then <code><Add> OnCreate</code> to add a method for the <code>WM_CREATE</code> message. The wizard will add the <code>OnCreate</code> method to the <code>CMainDialog</code> class.
Edit MainDialog.cpp, and add the following code to the <code>OnCreate</code> method to load and draw the progress bar animated GIF image:
Make sure the build configuration is set to the Release configuration, and build the MyActiveX ActiveX application.
You will also find it available for download at various other sites on the Internet. Install it and run it on the same system you are using to develop the control with Microsoft Visual Studio. To make it easier for initial testing of the application, you should make sure that the Microsoft IIS web server is installed on this same system.
When you first run the ActiveX Control Pad, it will create a default HTML web page for you. To insert an ActiveX control, right click within the <code><BODY></code> tag of the HTML source, and select Insert ActiveX Control. In the Insert ActiveX Control dialog, scroll down and select MyActiveX Control that you have created with Visual Studio, and click OK.
Figure 5. ActiveX Control Pad – Insert ActiveX Control
Two dialog boxes will be displayed in the ActiveX Control Pad, enabling you to modify the control. The Propertiesdialog is for modifying properties of the control, the Edit ActiveX Control dialog is for manually editing the control. You can close both of these dialogs as we can make any further changes necessary by manually editing the HTML code. You should now find an <code>OBJECT ID</code> tag inserted in the HTML code, similar to that shown in Figure 6. Change the size parameters of the control by changing to <code>“WIDTH=350”</code> and <code>“HEIGHT=50”</code> in the <code>OBJECT ID</code> tag. Save the HTML file for the web page to the file myactivex.htm in the root folder wwwroot of IIS web server.
Figure 6. ActiveX Control Pad – MyActiveX ActiveX Control
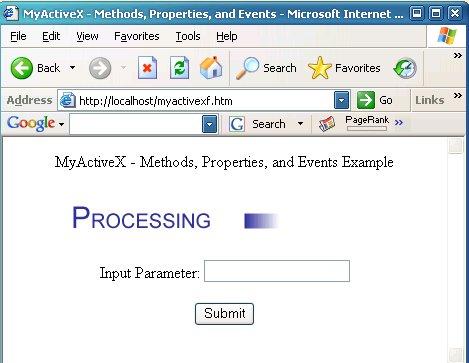
Figure 7. MyActiveX Control in Internet Explorer
Next, we need to build the ActiveX control so loading it from Internet Explorer browser does not result in annoying error messages complaining that it is an unsigned or unsafe control.
To create a signed ActiveX control, you must purchase a Code Signing Certificate from one of the certificate providers such as Thawte, Verisign, or GeoTrust. With this service, they will verify your identity and provide you certificate files you use to sign the ActiveX application. I chose Thawte for a Code Signing Certificate, who provided two files for signing the application, mycert.spc and mykey.pvk.
To sign the ActiveX application, we package the components of the application into a CAB file, which is downloaded from the web site and the ActiveX control is installed on the system. Part of installing the ActiveX control requires registering the control. To enable that to happen, the control must be built with the <code>OLESelfRegister</code> value defined in the <code>VERSIONINFO</code> structure of the ActiveX control. Versions of Microsoft Visual Studio up to VS 2003 inserted this entry, but Visual Studio 2005 does not. To add the entry, edit the resource file myactivex.rc to add the<code>OLESelfRegister</code> value, as shown below:
Before signing the application, the ActiveX control should be packaged into a CAB file. This CAB file will also contain an INF file that is used for installing your ActiveX control. To build a CAB file, you need the cabarc.exe tool available in the Microsoft Cabinet Software Development Kit. The following is an example of a simple INF file that can be used for packaging the MyActiveX control into a CAB file. For the CLSID line item, you should change the value to the same value as that in the <code>OBJECT ID</code> tag in the HTML web page you created earlier with the ActiveX Control Pad.
To create a CAB file, run cabarc as shown below. Important: Make sure the OCX and INF files are in same directory where you are running cabarc.exe, otherwise the CAB will not be extracted correctly after downloading from the web server. This is one of the problems that will cause a red X on the web page where the ActiveX control should be.
To sign the CAB file you created, you need the signcode.exe tool from Microsoft MSDN. Refer to the “Signing and Checking with Authenticode” reference at the end of this article. You use the signcode tool with the certificate files you obtained from purchasing a Coding Signing Certificate to sign the CAB file. The following is an example use of signcodeto sign myactivex.cab:
To use the signed CAB file in your web page, first copy the myactivex.cab to a folder on your web site, then you must modify the <code>OBJECT ID</code> tag on your web page with a <code>CODEBASE</code> parameter to reference this CAB file. Refer to Figure 8 for an example. If you load this page in Internet Explorer, it should download the CAB file and install your ActiveX control with no warning about an unsigned ActiveX control.
Figure 8. ActiveX Control Pad – MyActiveX with CODEBASE
To make a control that will load in Internet Explorer with no unsafe control warning or error messages, you must implement code that ensures safe initialization and safe scripting for an ActiveX control. Detailed information for doing that can be found in the article “Safe Initialization and Scripting for ActiveX Controls” on Microsoft MSDN. Refer to References at the end of this article for details. I found omissions and mistakes in this article that I have corrected for presentation in this article. Basically, all that needs to be done is to add code to the <code>DllRegisterServer</code> and<code>DllUnregisterServer</code> methods. The following is a step-by-step guide for making your ActiveX control safe:
Edit MyActiveX.cpp and add the following code. The value of <code>CLSID_SafeItem</code> should be taken from<code>IMPLEMENT_OLECREATE_EX</code> in the MyActiveXCtrl.cpp source file or the equivalent for your ActiveX control. It will also be the same value as the CLSID in the OBJECT ID tag on the HTML page with your ActiveX control.
Modify the <code>DllRegisterServer</code> method to add the highlighted code as shown:
Modify the <code>DllUnregisterServer</code> method to add the highlighted code as shown:
Communication between an ActiveX control and a web page is done through ActiveX control properties, methods, and events. In order to demonstrate these concepts, we will create a simple web page with a form entry to enter a text string. When a Submit button is pressed, the text entered is passed to the ActiveX control through an input parameter custom property. A method of the control is called which copies this text to an output parameter custom property, and then fires an event for this text to be displayed on the web page. Simply follow these steps in Visual Studio to implement this:
First, we will create the custom properties for passing text to and from the ActiveX control. In Class View, expand the element MyActiveXLib to select _DMyActiveX. Right click on _DMyActiveX, then Add, Add Property. In the Add Property Wizard dialog as shown in Figure 9, select <code>BSTR</code> for Property type, and enter “<code>InputParameter</code>” for Property name. The wizard will fill other fields automatically for you with “<code>m_InputParameter</code>” for Variable name and “<code>OnInputParameterChanged</code>” for Notification function. Click the Finish button where the wizard will automatically create the code to support this property. Do the same for Property name“<code>OutputParameter</code>” with the same Property type <code>BSTR</code>.
Figure 9. Add Property Wizard
Next, we will create a method to enable the web page to notify the control to transfer the text string input parameter to the output parameter. In Class View, expand the element MyActiveXLib to select _DMyActiveX. Right click on _DMyActiveX, then Add, Add Method. In the Add Property Wizard dialog, as shown in Figure 9, select <code>void</code> for Return type and enter “<code>LoadParameter</code>” for Method name. The wizard will automatically enter “<code>LoadParameter</code>” for Internal name. Click Finish where the wizard will automatically create the code to support this method.
Figure 10. Add Method Wizard
Now, we will create an event that enables the ActiveX control to notify the web page that it is completed transferring the text from the input parameter to the output parameter. Code in the web page will react to this event and respond by displaying the text in the output parameter to verify that this transfer has occurred by the ActiveX control. In Class View, right click on <code>CMyActiveXCtrl</code>, select Add, Add Event. In the Add Event Wizard, as shown in Figure 11, enter “<code>ParameterLoaded</code>” for Event name and change Internal name to “<code>FireParameterLoaded</code>”. Click Finish for the wizard to create the default code to support this event.
Figure 11. Add Event Wizard
With the above, the wizard has created a majority of the code for you. We only need to add two lines of code to implement the functionality for the ActiveX control to copy the text and notify the web page code through an event. Edit the source file MyActiveXCtrl.cpp, and add the following code to the <code>LoadParameter</code> method.
To test, use the ActiveX Control Pad to create the following HTML code:
Save this HTML code to your web server, and run it. You should see a web page with a progress bar displayed and a form entry to enter the Input Parameter text. Enter text in the field, and press Submit. This should result in a new page with “The parameter you entered is: ”, followed by the text you entered on the next line. A brief explanation of the HTML code follows.
When you press the Submit button, the JavaScript function <code>PassParameter</code> is invoked. This function copies text from the <code>StringInput</code> form field to the <code>InputParameter</code> property of the ActiveX control. It then calls the<code>LoadParameter</code> method of the control which copies the text from <code>InputParameter</code> to <code>OutputParameter</code> and calls<code>FireParameterLoaded()</code> to cause an ActiveX event. The following HTML code then responds to this event:
This article has no explicit license attached to it but may contain usage terms in the article text or the download files themselves. If in doubt please contact the author via the discussion board below.
from:http://www.codeproject.com/Articles/14533/A-Complete-ActiveX-Web-Control-Tutorial