一.概念:
JAVA Database connectivity 資料庫連接配接
java語言操作資料庫
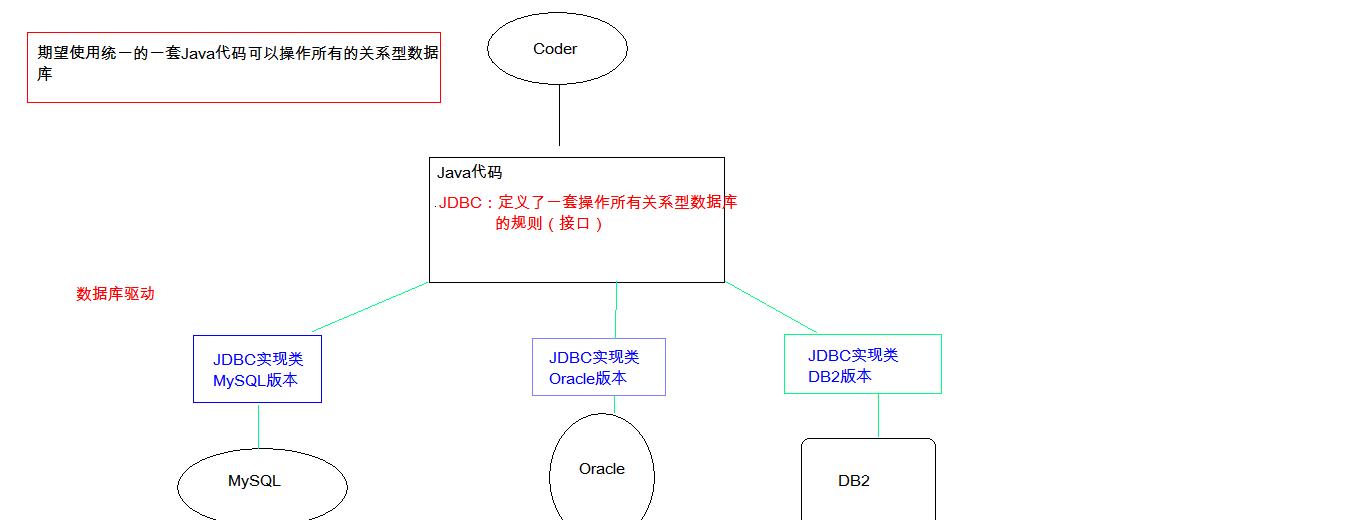
JDBC本質:其實是官方(sun公司)定義的一套操作所有關系型資料庫的規則,即接口。各個資料庫廠商去實作這套接口,提供資料庫驅動jar包。我們可以使用這套接口(JDBC)程式設計,真正執行的代碼是驅動jar包中的實作類。
二. 快速入門:
步驟:
1. 導入驅動jar包 mysql-connector-java-5.1.37-bin.jar
2. 注冊驅動
3. 擷取資料庫連接配接對象 Connection
4. 定義sql
5. 擷取執行sql語句的對象 Statement
6. 執行sql,接受傳回結果
7. 處理結果
8. 釋放資源
package com.imooc.jdbc;

import java.sql.Connection;
import java.sql.DriverManager;
import java.sql.Statement;

public class JDBC1 {
    public static void main(String[] args) throws Exception {

        Class.forName("com.mysql.jdbc.Driver");

        Connection conn = DriverManager.getConnection("jdbc:mysql://localhost:3306/db1", "root", "123456");

        String sql="update account set balance=500 where id=1";

        Statement stmt=conn.createStatement();

        int count=stmt.executeUpdate(sql);

        System.out.println(count);

        stmt.close();
        conn.close();


    }
}
報錯:Caused by: com.mysql.cj.exceptions.InvalidConnectionAttributeException: The server time zone value
需要加上時區 美國和中國不一樣
Connection conn = DriverManager.getConnection("jdbc:mysql://localhost:3306/db1?serverTimezone=UTC", "root", "123456");
2.1資料庫連接配接字元串
| 資料庫 | JDBC驅動類 | 連接配接字元串 |
| MySQL 5 | com.mysql.jdbc.Driver | jdbc:mysql://主機ip:端口/資料庫名 |
| MySQL 8 | com.mysql.cj.jdbc.Driver | |
| Oracle | oracle.jdbc.driver.OracleDriver | jdbc:oracle:thin:@主機ip:端口:資料庫名 |
| SQL Server | com.mircosoft.sqlserver.jdbc. SQLServerDriver | jdbc:mircosoft:sqlserver:主機ip:端 口;databasename=資料庫名 |
2.2資料庫連接配接字元串常用參數
| 參數名 | 建議參數值 | 說明 |
| useSSL | true(生産) false(開發) | 是否禁用ssl |
| useUnicode | true | 啟用unicode編碼傳輸資料 |
| characterEncoding | UTF-8 | 使用UTF-8編碼傳輸資料 |
| serverTimezone | Asia/Shanghai | 使用東8時區時間,UTC+8 |
| allowPublicKeyRetrieval | 允許從用戶端擷取公鑰加密傳輸 |
三. 詳解各個對象:
1. DriverManager:驅動管理對象
1. 注冊驅動:告訴程式該使用哪一個資料庫驅動jar 寫代碼使用: Class.forName("com.mysql.jdbc.Driver");
2. 擷取資料庫連接配接: static Connection getConnection(String url, String user, String password)
* url:指定連接配接的路徑(jdbc:mysql://ip位址(域名):端口号/資料庫名稱)
* user:使用者名
* password:密碼
2. Connection:資料庫連接配接對象
1. 擷取執行sql 的對象
* Statement createStatement()
* PreparedStatement prepareStatement(String sql)
2. 管理事務:
* 開啟事務:setAutoCommit(boolean autoCommit) :調用該方法設定參數為false,即開啟事務
* 送出事務:commit()
* 復原事務:rollback()
3. Statement:執行sql的對象
1. 執行sql
1. boolean execute(String sql) :可以執行任意的sql 了解
2. int executeUpdate(String sql) :執行DML(insert、update、delete)語句、DDL(create,alter、drop)語句
* 傳回值:影響的行數,可以通過這個影響的行數判斷DML語句是否執行成功 傳回值>0的則執行成功,反之,則失敗。
3. ResultSet executeQuery(String sql) :執行DQL(select)語句
2. 練習:
1. account表 添加一條記錄
2. account表 修改記錄
3. account表 删除一條記錄
代碼:
Statement stmt = null;
                    Connection conn = null;
                    try {
                        //1. 注冊驅動
                        Class.forName("com.mysql.jdbc.Driver");
                        //2. 定義sql
                        String sql = "insert into account values(null,'王五',3000)";
                        //3.擷取Connection對象
                        conn = DriverManager.getConnection("jdbc:mysql:///db3", "root", "root");
                        //4.擷取執行sql的對象 Statement
                        stmt = conn.createStatement();
                        //5.執行sql
                        int count = stmt.executeUpdate(sql);//影響的行數
                        //6.處理結果
                        System.out.println(count);
                        if(count > 0){
                            System.out.println("添加成功!");
                        }else{
                            System.out.println("添加失敗!");
                        }

                    } catch (ClassNotFoundException e) {
                        e.printStackTrace();
                    } catch (SQLException e) {
                        e.printStackTrace();
                    }finally {
                        //stmt.close();
                        //7. 釋放資源
                        //避免空指針異常
                        if(stmt != null){
                            try {
                                stmt.close();
                            } catch (SQLException e) {
                                e.printStackTrace();
                            }
                        }

                        if(conn != null){
                            try {
                                conn.close();
                            } catch (SQLException e) {
                                e.printStackTrace();
                            }
                        }
                    }
4. ResultSet:結果集對象,封裝查詢結果
boolean next(): 遊标向下移動一行,判斷目前行是否是最後一行末尾(是否有資料),如果是,則傳回false,如果不是則傳回true (while(rs.next()){}
getXxx(參數):擷取資料( int getInt() , String getString()) int:代表列的編号,從1開始 如: getString(1) String:代表列名稱。 如: getDouble("balance")
int id = rs.getInt(1);
                        String name = rs.getString("name");
                        double balance = rs.getDouble(3);

                        System.out.println(id + "---" + name + "---" + balance);
                    }
* 練習:
定義一個方法,查詢emp表的資料将其封裝為對象,然後裝載集合,傳回。
1. 定義Emp類
2. 定義方法 public List<Emp> findAll(){}
3. 實作方法 select * from emp;
5. PreparedStatement:執行sql的對象
1. SQL注入問題:在拼接sql時,有一些sql的特殊關鍵字參與字元串的拼接。會造成安全性問題
(1). 輸入使用者随便,輸入密碼:a' or 'a' = 'a
(2). sql:select * from user where username = 'fhdsjkf' and password = 'a' or 'a' = 'a'
2. 解決sql注入問題:使用PreparedStatement對象來解決
3. 預編譯的SQL:參數使用?作為占位符
4. 使用步驟:
(1). 導入驅動jar包 mysql-connector-java-5.1.37-bin.jar
(2). 注冊驅動
(3). 擷取資料庫連接配接對象 Connection
(4). 定義sql 如:select * from user where username = ? and password = ?;
(5). 擷取執行sql語句的對象 PreparedStatement Connection.prepareStatement(String sql)
(6). 給?指派 方法: setXxx(參數1,參數2) 參數1:?的位置編号 從1 開始 參數2:?的值
7. 執行sql,接受傳回結果,不需要傳遞sql語句
8. 處理結果
9. 釋放資源
四.抽取JDBC工具類 : JDBCUtils
package com.imooc.utils;

import java.io.FileReader;
import java.io.IOException;
import java.net.URL;
import java.sql.*;
import java.util.Properties;

public class JDBCUtil {
    private static String url;
    private static String user;
    private static String password;
    private static String driver;
    static{
            ClassLoader classLoader= JDBCUtil.class.getClassLoader();
            URL resource = classLoader.getResource("jdbc.properties");
            Properties properties=new Properties();
        try {

            properties.load(new FileReader(resource.getPath()));
            url=properties.getProperty("url");
            user=properties.getProperty("user");
            password=properties.getProperty("password");
            driver=properties.getProperty("driver");

        } catch (IOException e) {
            e.printStackTrace();
        }
    }

    public static Connection getConnection() throws SQLException {

        return DriverManager.getConnection(url,user,password);
    }
    public static void Close(Statement statement,Connection connection) {
        if (statement!=null){
            try {
                statement.close();
            } catch (SQLException e) {
                e.printStackTrace();
            }
        }
        if (connection!=null){
            try {
                connection.close();
            } catch (SQLException e) {
                e.printStackTrace();
            }
        }

    }
    public static void Close(ResultSet resuleSet, Statement statement, Connection connection){
        if (resuleSet!=null){
            try {
                resuleSet.close();
            } catch (SQLException e) {
                e.printStackTrace();
            }
        }
        if (statement!=null){
            try {
                statement.close();
            } catch (SQLException e) {
                e.printStackTrace();
            }
        }
        if (connection!=null){
            try {
                connection.close();
            } catch (SQLException e) {
                e.printStackTrace();
            }
        }
    }
}
練習:
* 需求:
1. 通過鍵盤錄入使用者名和密碼
2. 判斷使用者是否登入成功
* select * from user where username = "" and password = "";
* 如果這個sql有查詢結果,則成功,反之,則失敗
* 步驟:
1. 建立資料庫表 user
CREATE TABLE USER(
                    id INT PRIMARY KEY AUTO_INCREMENT,
                    username VARCHAR(32),
                    PASSWORD VARCHAR(32)

                );

                INSERT INTO USER VALUES(NULL,'zhangsan','123');
                INSERT INTO USER VALUES(NULL,'lisi','234');
2. 代碼實作:
public class JDBCDemo9 {

                    public static void main(String[] args) {
                        //1.鍵盤錄入,接受使用者名和密碼
                        Scanner sc = new Scanner(System.in);
                        System.out.println("請輸入使用者名:");
                        String username = sc.nextLine();
                        System.out.println("請輸入密碼:");
                        String password = sc.nextLine();
                        //2.調用方法
                        boolean flag = new JDBCDemo9().login(username, password);
                        //3.判斷結果,輸出不同語句
                        if(flag){
                            //登入成功
                            System.out.println("登入成功!");
                        }else{
                            System.out.println("使用者名或密碼錯誤!");
                        }


                    }


                    /**
                     * 登入方法
                     */
                    public boolean login(String username ,String password){
                        if(username == null || password == null){
                            return false;
                        }
                        //連接配接資料庫判斷是否登入成功
                        Connection conn = null;
                        Statement stmt =  null;
                        ResultSet rs = null;
                        //1.擷取連接配接
                        try {
                            conn =  JDBCUtils.getConnection();
                            //2.定義sql
                            String sql = "select * from user where username = '"+username+"' and password = '"+password+"' ";
                            //3.擷取執行sql的對象
                            stmt = conn.createStatement();
                            //4.執行查詢
                            rs = stmt.executeQuery(sql);
                            //5.判斷
                           /* if(rs.next()){//如果有下一行,則傳回true
                                return true;
                            }else{
                                return false;
                            }*/
                           return rs.next();//如果有下一行,則傳回true

                        } catch (SQLException e) {
                            e.printStackTrace();
                        }finally {
                            JDBCUtils.close(rs,stmt,conn);
                        }


                        return false;
                    }
                }
五.JDBC控制事務:
1. 事務:一個包含多個步驟的業務操作。如果這個業務操作被事務管理,則這多個步驟要麼同時成功,要麼同時失敗。
2. 操作:
1. 開啟事務
2. 送出事務
3. 復原事務
3. 使用Connection對象來管理事務
* 開啟事務:setAutoCommit(boolean autoCommit) :調用該方法設定參數為false,即開啟事務
* 在執行sql之前開啟事務
* 送出事務:commit()
* 當所有sql都執行完送出事務
* 復原事務:rollback()
* 在catch中復原事務
4. 代碼:
public class JDBCDemo10 {

            public static void main(String[] args) {
                Connection conn = null;
                PreparedStatement pstmt1 = null;
                PreparedStatement pstmt2 = null;

                try {
                    //1.擷取連接配接
                    conn = JDBCUtils.getConnection();
                    //開啟事務
                    conn.setAutoCommit(false);

                    //2.定義sql
                    //2.1 張三 - 500
                    String sql1 = "update account set balance = balance - ? where id = ?";
                    //2.2 李四 + 500
                    String sql2 = "update account set balance = balance + ? where id = ?";
                    //3.擷取執行sql對象
                    pstmt1 = conn.prepareStatement(sql1);
                    pstmt2 = conn.prepareStatement(sql2);
                    //4. 設定參數
                    pstmt1.setDouble(1,500);
                    pstmt1.setInt(2,1);

                    pstmt2.setDouble(1,500);
                    pstmt2.setInt(2,2);
                    //5.執行sql
                    pstmt1.executeUpdate();
                    // 手動制造異常
                    int i = 3/0;

                    pstmt2.executeUpdate();
                    //送出事務
                    conn.commit();
                } catch (Exception e) {
                    //事務復原
                    try {
                        if(conn != null) {
                            conn.rollback();
                        }
                    } catch (SQLException e1) {
                        e1.printStackTrace();
                    }
                    e.printStackTrace();
                }finally {
                    JDBCUtils.close(pstmt1,conn);
                    JDBCUtils.close(pstmt2,null);
                }


            }

        }
六.資料庫連接配接池
1. 概念:
其實就是一個容器(集合),存放資料庫連接配接的容器。
當系統初始化好後,容器被建立,容器中會申請一些連接配接對象,當使用者來通路資料庫時,從容器中擷取連接配接對象,使用者通路完之後,會将連接配接對象歸還給容器。
2. 實作:
1. 标準接口:DataSource javax.sql包下的
1. 方法:
* 擷取連接配接:getConnection()
* 歸還連接配接:Connection.close()。如果連接配接對象Connection是從連接配接池中擷取的,那麼調用Connection.close()方法,則不會再關閉連接配接了。而是歸還連接配接
2. 一般我們不去實作它,有資料庫廠商來實作
1. C3P0:資料庫連接配接池技術
2. Druid:資料庫連接配接池實作技術,由阿裡巴巴提供的
3. Druid:資料庫連接配接池實作技術,由阿裡巴巴提供的
1. 步驟:
1. 導入jar包 druid-1.0.9.jar
2. 定義配置檔案:
* 是properties形式的
* 可以叫任意名稱,可以放在任意目錄下
3. 加載配置檔案。Properties
4. 擷取資料庫連接配接池對象:通過工廠來來擷取 DruidDataSourceFactory
5. 擷取連接配接:getConnection
* 代碼:
//3.加載配置檔案
properties
driverClassName=com.mysql.cj.jdbc.Driver
url=jdbc:mysql:///db1?serverTimezone=UTC
username=root
password=123456
initialSize=5
maxActive=10
maxWait=3000
Properties pro = new Properties();
InputStream is = DruidDemo.class.getClassLoader().getResourceAsStream("druid.properties");
pro.load(is);
//4.擷取連接配接池對象
DataSource ds = DruidDataSourceFactory.createDataSource(pro);
//5.擷取連接配接
Connection conn = ds.getConnection(); 3. 定義工具類
1. 定義一個類 JDBCUtils
2. 提供靜态代碼塊加載配置檔案,初始化連接配接池對象
3. 提供方法
1. 擷取連接配接方法:通過資料庫連接配接池擷取連接配接
2. 釋放資源
3. 擷取連接配接池的方法
* 代碼:
package com.imooc.utils;

import com.alibaba.druid.pool.DruidDataSourceFactory;

import javax.sql.DataSource;
import java.io.IOException;
import java.io.InputStream;
import java.sql.Connection;
import java.sql.ResultSet;
import java.sql.SQLException;
import java.sql.Statement;
import java.util.Properties;

public class JDBCUtils {
    private  static DataSource ds;
    static{
        try {
            Properties properties=new Properties();
            InputStream resourceAsStream = JDBCUtils.class.getClassLoader().getResourceAsStream("druid.properties");
            properties.load(resourceAsStream);
            ds= DruidDataSourceFactory.createDataSource(properties);

        } catch (IOException e) {
            e.printStackTrace();
        } catch (Exception e) {
            e.printStackTrace();
        }

    }
    public static Connection getConnection() throws SQLException {
        return ds.getConnection();
    }
    public static  void Close(Statement statement,Connection connection){
        Close(null,statement,connection);
    }
    public static  void Close(ResultSet resultSet, Statement statement, Connection connection){
        if (resultSet!=null){
            try {
                resultSet.close();
            } catch (SQLException e) {
                e.printStackTrace();
            }
        }
        if (statement!=null){
            try {
                statement.close();
            } catch (SQLException e) {
                e.printStackTrace();
            }
        }
        if(connection!=null){
            try {
                connection.close();
            } catch (SQLException e) {
                e.printStackTrace();
            }
        }
    }
    public static DataSource getDataSoure(){
        return ds;
    }
}
七.Spring JDBC
* Spring架構對JDBC的簡單封裝。提供了一個JDBCTemplate對象簡化JDBC的開發
1. 導入jar包
2. 建立JdbcTemplate對象。依賴于資料源DataSource
* JdbcTemplate template = new JdbcTemplate(ds);
3. 調用JdbcTemplate的方法來完成CRUD的操作
* update():執行DML語句。增、删、改語句
* queryForMap():查詢結果将結果集封裝為map集合,将列名作為key,将值作為value 将這條記錄封裝為一個map集合
* 注意:這個方法查詢的結果集長度隻能是1
* queryForList():查詢結果将結果集封裝為list集合
* 注意:将每一條記錄封裝為一個Map集合,再将Map集合裝載到List集合中
* query():查詢結果,将結果封裝為JavaBean對象
* query的參數:RowMapper
* 一般我們使用BeanPropertyRowMapper實作類。可以完成資料到JavaBean的自動封裝
* new BeanPropertyRowMapper<類型>(類型.class)
* queryForObject:查詢結果,将結果封裝為對象
* 一般用于聚合函數的查詢
package com.imooc.JDBCTemple;

import com.imooc.utils.JDBCUtils;
import org.springframework.jdbc.core.JdbcTemplate;

public class JDBCTempleDemo1 {
    public static void main(String[] args) {
        JdbcTemplate temple=new JdbcTemplate(JDBCUtils.getDataSoure());
        String sql="update account set balance=5000 where id=?";
        int i=temple.update(sql,3);
        System.out.println(i);

    }
}
4. 練習:
* 需求:
1. 修改1号資料的 balance為 10000
2. 添加一條記錄
3. 删除剛才添加的記錄
4. 查詢id為1的記錄,将其封裝為Map集合
5. 查詢所有記錄,将其封裝為List
6. 查詢所有記錄,将其封裝為Emp對象的List集合
7. 查詢總記錄數
package com.imooc.JDBCTemple;

import com.imooc.utils.JDBCUtils;
import org.junit.Test;
import org.springframework.jdbc.core.BeanPropertyRowMapper;
import org.springframework.jdbc.core.JdbcTemplate;

import java.util.List;
import java.util.Map;

public class JDBCTempleDemo2 {
    @Test
    public void update1() {
        JdbcTemplate template=new JdbcTemplate(JDBCUtils.getDataSoure());
        String  sql="update account set balance=10000 where id=?";
        int updatecount = template.update(sql, 1);
        System.out.println(updatecount);
    }
    @Test
    public void sdd(){
        JdbcTemplate template =new JdbcTemplate(JDBCUtils.getDataSoure());
        String sql="insert into account values (null,?,?,?,?)";
        int updatecount = template.update(sql, "zxx", 118, "西安", 8633.2);
        System.out.println(updatecount);
    }
    @Test
    public void delete1(){
        JdbcTemplate template=new JdbcTemplate(JDBCUtils.getDataSoure());
        String sql="delete from account where name=?";
        int deletecount = template.update(sql, "zxx");
        System.out.println(deletecount);
    }
    @Test
    public void getMap1(){
        JdbcTemplate template=new JdbcTemplate(JDBCUtils.getDataSoure());
        String sql="select * from account where id=?";
        Map<String, Object> stringObjectMap = template.queryForMap(sql, 1);
        System.out.println(stringObjectMap);
    }
    @Test
    public void getObj(){
        JdbcTemplate template=new JdbcTemplate(JDBCUtils.getDataSoure());
        String sql="select * from account ";
        List<Emp> query = template.query(sql, new BeanPropertyRowMapper<Emp>(Emp.class));
        for(Emp emp : query){
            System.out.println(emp);
        }
    }
    @Test
    public void getCount(){
        JdbcTemplate template=new JdbcTemplate(JDBCUtils.getDataSoure());
        String sql="select count(id) from account ";
        Long aLong = template.queryForObject(sql, long.class);
        System.out.println(aLong);
    }


}