背景
在linux中執行Jmeter腳本時候,大家是否一直使用【jmeter -n -t [jmx file] -l [results file] -e -o [Path to web report folder]】指令執行,是否想過通過shell指令執行或者python執行,今天簡單介紹下shell指令執行,前置條件需要配置Jmeter環境變量,如果沒有配置,需要在腳本中修改相應位置。
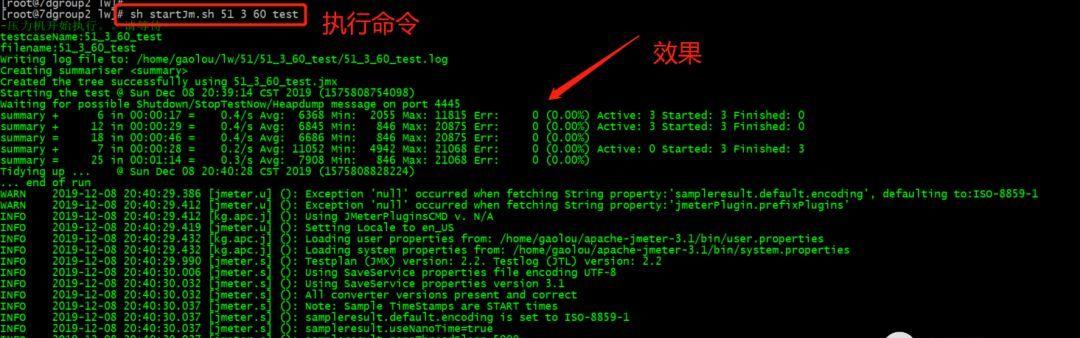
效果
shell腳本

Jmeter環境變量配置參考
<code>vi ~/.bash_profile</code><code>#jmeter:路徑</code><code>JMETER_HOME=/root/tools/apache-jmeter-3.3</code><code>PATH=$PATH:$HOME/bin:$JMETER_HOME/bin:</code><code>export PATH</code>
<code></code><code>#執行生效:</code><code>source ~/.bash_profile</code>
驗證
shell腳本參考代碼
<code>#!/bin/bash</code>
<code></code><code># author:liwen</code>
<code></code><code># 7DGroup</code>
<code></code><code># 2019/12/08/20/50</code>
<code></code><code>cmdsh="/home/gaolou/apache-jmeter-3.1/bin/JMeterPluginsCMD.</code>
<code>sh"</code><code>case=$1</code>
<code></code><code>mNum=$</code>
<code>2</code><code>durationTime=$3</code>
<code></code><code>mark=$4</code>
<code></code><code>resultDataFileName="resultData.csv"</code>
<code></code><code>#hostIps="101.201.210.163"</code>
<code></code><code>nowPwd=`pwd`</code><code></code><code>echo -e "\033[32m-壓力機開始執行。。請等待-\033[1m"</code>
<code></code><code></code><code></code><code>echo testcaseName:${case}_${mNum}_${durationTime}_${mark}</code>
<code></code><code>if [ -z ${case} ];then</code>
<code></code><code>echo -e "\033[32m請輸入腳本名,線程數,執行時間,備注! 輸入腳本名\033[0m"</code>
<code></code><code>echo "ERROR"</code>
<code></code><code>exit 1</code>
<code></code><code>fi</code>
<code></code><code>if</code>
<code>[ -z ${mNum</code>
<code></code><code>} ];then</code>
<code></code><code>echo -e "\033[32m請輸入腳本名,線程數,執行時間,備注! 輸入線程數\033[1m"</code>
<code></code><code></code><code>echo "ERROR"</code>
<code></code><code>if [ -z ${durationTime} ];then</code>
<code></code><code>echo -e "\033[32m請輸入腳本名,線程數,執行時間,備注! 輸入備注\033[1m"</code>
<code></code><code></code><code></code><code></code><code>oneTest()</code>
<code>{</code><code>filename=${case}_${mNum}_${durationTime}_${mark}</code>
<code></code><code>echo "filename:"${filename}</code>
<code></code><code>mkdir -p ${nowPwd}/${case}</code>
<code></code><code>cd ${nowPwd}/${case}</code>
<code></code><code>cp ${nowPwd}/testPlan/${case}.jmx ${nowPwd}/${case}/${case}.jmx</code>
<code></code><code>if [ ! -f ${resultDataFileName} ];then</code>
<code></code><code>echo -e "sceneName,sceneThreadNum,duration(s),interfaceName,interfaceNum,totalCount,tps,errorPersent,avgTims(ms),persentTime(ms)" > ${resultDataFileName}</code>
<code></code><code>rm -rf ${filename}</code>
<code></code><code>mkdir ${filename}</code>
<code></code><code>cp ${case}.jmx ${nowPwd}/${case}/${filename}/${filename}.jmx</code>
<code></code><code>cd ${nowPwd}/${case}/${filename}/</code>
<code></code><code>sed -i "s#name=\"ThreadGroup\.num_threads\">2<#name=\"ThreadGroup\.num_threads\">$((2*mNum))<#g" ${filename}.jmx</code>
<code></code><code>sed -i "s#name=\"ThreadGroup\.num_threads\">1<#name=\"ThreadGroup\.num_threads\">$((1*mNum))<#g" ${filename}.jmx</code>
<code></code><code>sed -i "s#ERRORXML#${nowPwd}/${case}/${filename}/${filename}_ERROR.xml#g" ${filename}.jmx</code>
<code></code><code>sed -i "s#ThreadGroup.scheduler\">.*</#ThreadGroup.scheduler\">true</#g" ${filenam</code>
<code></code><code>e}.jmx</code>
<code></code><code>sed -i "s#LoopController\.loops\">.*</#LoopController\.loops\">-1</#g" ${filename}.jmx</code>
<code></code><code>sed -i "s#LoopController\.continue_forever\">.*</#LoopController\.continue_forever\">true</#g" ${filename}.jmx</code>
<code></code><code>sed -i "s#ThreadGroup.duration\">.*</#ThreadGroup.duration\">${durationTime}</#g" ${filename}.jmx</code><code></code><code>if [ -z ${hostIps} ];then</code>
<code></code><code>#jmeter -n -t ${filename}.jmx -l ${filename}.jtl -j ${filename}.log</code>
<code></code><code>jmeter -n -t ${filename}.jmx -l ${filename}.jtl -j ${filename}.log -e -o ${filename}</code>
<code></code><code>else</code>
<code></code><code>jmeter -n -t ${filename}.jmx -R ${hostIps} -l ${filename}.jtl -j ${filename}.log -e -o ${filename}</code>
<code></code><code>#jmeter -n -t ${filename}.jmx -R ${hostIps} -l ${filename}.jtl -j ${filename}.log</code>
<code></code><code>fi</code><code></code><code>${cmdsh} --generate-csv ${filename}.csv --input-jtl ${filename}.jtl --plugin-type AggregateReport</code>
<code></code><code>local sumThread=`grep "<stringProp name=\"ThreadGroup.num_threads\">" ${filename}.jmx |awk -F\> '{print $2}'|awk -F\< 'BEGIN{sum=0}{sum=sum+$1}END{print sum}'`</code><code></code>
<code></code><code>if [ -z ${hostIps} ];then</code>
<code></code><code>hostNum=1</code>
<code></code><code>hostNum=`echo ${hostIps}|awk -F, '{print NF}'`</code>
<code></code><code>let sumThread=sumThread*hostNum</code>
<code></code><code>let mNum=mNum*hostNum</code>
<code></code><code>sed -n '2,$p' ${filename}.csv|grep -v TOTAL| awk -F, -v case=${filename} -v tnum=${sumThread} -v duration=${durationTime}</code>
<code>'{printf("%s,%s,%s,%s,%s,%s,%s,%s,90%time:%s;95%time:%s;99%time:%s\n",case,tnum,duration,</code>
<code></code><code>$1,$2,$11,$10,$3,$5,$6,$7)}' >> sDGroup</code>
<code></code><code>local totalGroup=`cat sDGroup|wc -l`</code>
<code></code><code>for((i=1;i<=${totalGroup};i++))</code>
<code></code><code>do</code>
<code></code><code>sed -n "${i}p" sDGroup|awk -F, -v tnum=${mNum} '{printf("%s,%s,%s,%s,%s,%s,%s,%s,%s,%s\n",$1,$2,$3,$4,tnum,$5,$6,$7,$8,$9)}' >>../${resultDataFileName}</code>
<code></code><code> done</code>
<code></code><code>}</code>
<code></code><code>oneTest</code><code></code><code>echo -e "\033[32m-壓力已經結束-\033[1m"</code>
解釋:
腳本執行方法:
先給予可執行權限:chomd a+x startJmeter.sh
執行方法:sh startJmeter.sh 腳本名字 并發數 執行時間 備注
<code>cmdsh="/home/gaolou/apache-jmeter-3.1/bin/JMeterPluginsCMD.sh"</code>
<code></code><code>case=$1 #腳本名字</code>
<code></code><code>mNum=$2 #并發數</code>
<code></code><code>durationTime=$3 #執行時間</code>
<code></code><code>mark=$4 #備注</code>
<code></code><code>resultDataFileName="resultData.csv" #csv指令儲存資料</code>
<code></code><code>#hostIps="101.201.210.163" </code>
<code></code><code> #如果是多台機器需要取消該注釋,把壓力機器全部加上</code>
說明:通過sed -i 替換執行并發數、執行時間等資訊
<code>sed -i "s#name=\"ThreadGroup\.num_threads\">2<#name=\"ThreadGroup\.num_threads\">$((2*mNum))<#g" ${filename}.jmx</code>
<code></code><code>sed -i "s#ThreadGroup.scheduler\">.*</#ThreadGroup.scheduler\">true</#g" ${filename}.jmx</code>
<code></code><code>sed -i "s#ThreadGroup.duration\">.*</#ThreadGroup.duration\">${durationTime}</#g" ${filename}.jmx</code>
說明:通過封裝Jmeter -n -t 。。。等資訊去執行腳本,該執行指令可以根據自己需要修改
<code>if [ -z ${hostIps} ];then</code>
說明:通過插件 JMeterPluginsCMD.sh執行擷取csv資料,如果想知道該插件詳細資訊可以百度查詢怎麼使用。
<code>${cmdsh} --generate-csv ${filename}.csv --input-jtl ${filename}.jtl --plugin-type AggregateReport</code>
<code></code><code>local sumThread=`grep "<stringProp name=\"ThreadGroup.num_threads\">" ${filename}.jmx |awk -F\> '{print $2}'|awk -F\< 'BEGIN{sum=0}{sum=sum+$1}END{print sum}'`</code>
<code></code><code>done</code>
上面腳本寫法需要多多注意,否則在通過腳本執行會達不到自己效果;
實際上shell腳本是替換【ThreadGroup.num_threads">1</stringProp>】
表示目前執行的腳本名字
表示原始腳本
csc結果儲存
說明:
vim日志
通過檢視日志可以看出執行全部資訊,這樣友善腳本調試腳本與錯誤跟蹤
下載下傳報告
<code>tar指令</code>
<code></code><code>解包:tar zxvf FileName.tar</code>
<code></code><code>打包:tar zcvf FileName.tar DirName</code>
sz filename.tar
tps
總結
通過shell腳本順利執行Jmeter腳本,如果是長時間執行可以采用背景執行方法,加上【nohup sh startJm.sh 腳本 并發資料 執行時間 備注 &】這樣執行不用擔心ssh視窗執行Jmeter失敗,通過tail -f nohup.log檢視執行日志。