一、任務排程政策
當我們将topology送出到storm叢集的時候,任務是怎樣配置設定的呢,這就需要了解storm的任務排程政策,這裡主要給大家分享預設的排程政策DefaultScheduler,在storm的1.1.0版本已經支援4種排程政策,分别是DefaultScheduler,IsolationScheduler,MultitenantScheduler,ResourceAwareScheduler。
二、Topology的送出過程
在了解預設的排程政策之前,先看一下我們送出一個topology到叢集的整個流程圖。
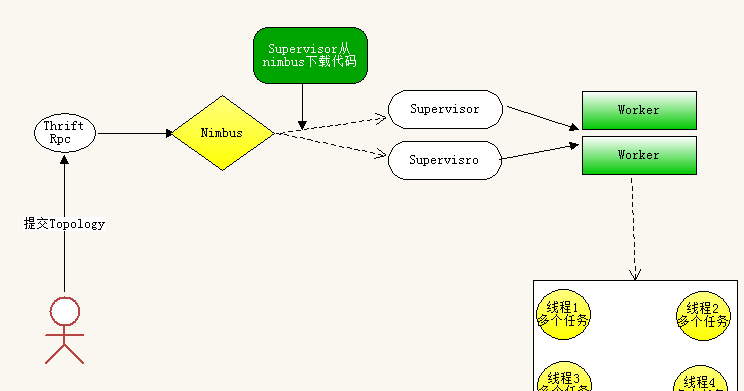
主要分為幾步:
1、非本地模式下,用戶端通過thrift調用nimbus接口,來上傳代碼到nimbus并觸發送出操作.
2、nimbus進行任務配置設定,并将資訊同步到zookeeper.
3、supervisor定期擷取任務配置設定資訊,如果topology代碼缺失,會從nimbus下載下傳代碼,并根據任務配置設定資訊,同步worker.
4、worker根據配置設定的tasks資訊,啟動多個executor線程,同時執行個體化spout、bolt、acker等元件,此時,等待所有connections(worker和其它機器通訊的網絡連接配接)啟動完畢,storm叢集即進入工作狀态。
5、除非顯示調用kill topology,否則spout、bolt等元件會一直運作。
下面我們來看一下整個topolgoy送出過程的源代碼
Main方法裡面的送出代碼
StormSubmitter.submitTopology("one-work",config,builder.createTopology()); 然後調用下面方法
public static void submitTopologyAs(String name, Map stormConf, StormTopology topology, SubmitOptions opts, ProgressListener progressListener, String asUser)
            throws AlreadyAliveException, InvalidTopologyException, AuthorizationException, IllegalArgumentException {

     //配置檔案必須能夠被Json序列化
        if(!Utils.isValidConf(stormConf)) {
            throw new IllegalArgumentException("Storm conf is not valid. Must be json-serializable");
        }
        stormConf = new HashMap(stormConf);
     //将指令行的參數加入stormConf
        stormConf.putAll(Utils.readCommandLineOpts());
     //先加載defaults.yaml, 然後再加載storm.yaml
        Map conf = Utils.readStormConfig();
        conf.putAll(stormConf);
      //設定zookeeper的相關權限
        stormConf.putAll(prepareZookeeperAuthentication(conf));
        validateConfs(conf, topology);
        Map<String,String> passedCreds = new HashMap<>();
        if (opts != null) {
            Credentials tmpCreds = opts.get_creds();
            if (tmpCreds != null) {
                passedCreds = tmpCreds.get_creds();
            }
        }
        Map<String,String> fullCreds = populateCredentials(conf, passedCreds);
        if (!fullCreds.isEmpty()) {
            if (opts == null) {
                opts = new SubmitOptions(TopologyInitialStatus.ACTIVE);
            }
            opts.set_creds(new Credentials(fullCreds));
        }
        try {
           //本地模式
            if(localNimbus!=null) {
                LOG.info("Submitting topology " + name + " in local mode");
                if(opts!=null) {
                    localNimbus.submitTopologyWithOpts(name, stormConf, topology, opts);
                } else {
                    // this is for backwards compatibility
                    localNimbus.submitTopology(name, stormConf, topology);
                }
                LOG.info("Finished submitting topology: " +  name);
            //這裡重點分析将topology送出到叢集模式
            } else {
           //将配置資訊轉為json字元串
                String serConf = JSONValue.toJSONString(stormConf);
            //校驗叢集中topology-name是否已經存在
                if(topologyNameExists(conf, name, asUser)) {
                    throw new RuntimeException("Topology with name `" + name + "` already exists on cluster");
                }
         //将jar包上傳至nimbus,這個時候topology還沒有正在跑起來,隻是将jar送出到了nimbus,等待後續的任務排程
                String jar = submitJarAs(conf, System.getProperty("storm.jar"), progressListener, asUser);
                try (
        //擷取Nimbus client對象
     NimbusClient client = NimbusClient.getConfiguredClientAs(conf, asUser)){
                    LOG.info("Submitting topology " + name + " in distributed mode with conf " + serConf);
       //調用submitTopologyWithOpts正式向nimbus送出拓撲,其實所謂的送出拓撲,就是将拓撲的配置資訊通過thrift發送到thrift server,并把jar包上傳到nimbus,等待nimbus的後續處//理,此時拓撲并未真正起來,直至recv_submitTopology獲得成功的傳回資訊為止
                    if (opts != null) {
                        client.getClient().submitTopologyWithOpts(name, jar, serConf, topology, opts);
                    } else {
                        // this is for backwards compatibility
                        client.getClient().submitTopology(name, jar, serConf, topology);
                    }
                    LOG.info("Finished submitting topology: " + name);
                } catch (InvalidTopologyException e) {
                    LOG.warn("Topology submission exception: " + e.get_msg());
                    throw e;
                } catch (AlreadyAliveException e) {
                    LOG.warn("Topology already alive exception", e);
                    throw e;
                }
            }
        } catch(TException e) {
            throw new RuntimeException(e);
        }
        invokeSubmitterHook(name, asUser, conf, topology);
    }
繼續調用
public static String submitJarAs(Map conf, String localJar, ProgressListener listener, String asUser) {
        if (localJar == null) {
            throw new RuntimeException("Must submit topologies using the 'storm' client script so that StormSubmitter knows which jar to upload.");
        }
       //如果擷取了nimbus client
        try (NimbusClient client = NimbusClient.getConfiguredClientAs(conf, asUser)) {
           //擷取topology-jar對應的存放位址
            String uploadLocation = client.getClient().beginFileUpload();
            LOG.info("Uploading topology jar " + localJar + " to assigned location: " + uploadLocation);
            BufferFileInputStream is = new BufferFileInputStream(localJar, THRIFT_CHUNK_SIZE_BYTES);
            long totalSize = new File(localJar).length();
            if (listener != null) {
                listener.onStart(localJar, uploadLocation, totalSize);
            }
            long bytesUploaded = 0;
            while(true) {
                byte[] toSubmit = is.read();
                bytesUploaded += toSubmit.length;
                if (listener != null) {
                    listener.onProgress(localJar, uploadLocation, bytesUploaded, totalSize);
                }
                if(toSubmit.length==0) break;
                  //一塊一塊的送出jar
                client.getClient().uploadChunk(uploadLocation, ByteBuffer.wrap(toSubmit));
            }
            //完成jar包送出
            client.getClient().finishFileUpload(uploadLocation);
            if (listener != null) {
                listener.onCompleted(localJar, uploadLocation, totalSize);
            }
            LOG.info("Successfully uploaded topology jar to assigned location: " + uploadLocation);
           //傳回存放jar的位置
            return uploadLocation;
        } catch(Exception e) {
            throw new RuntimeException(e);
        }
    }
繼續調用
public void submitTopology(String name, String uploadedJarLocation, String jsonConf, StormTopology topology) throws AlreadyAliveException, InvalidTopologyException, AuthorizationException, org.apache.thrift.TException
    {
     //發送topology相關資訊到nimbus
      send_submitTopology(name, uploadedJarLocation, jsonConf, topology);
   //接收傳回結果
     recv_submitTopology();
   }
繼續調用:
public void send_submitTopology(String name, String uploadedJarLocation, String jsonConf, StormTopology topology) throws org.apache.thrift.TException{
      submitTopology_args args = new submitTopology_args();
      args.set_name(name);
      args.set_uploadedJarLocation(uploadedJarLocation);
      args.set_jsonConf(jsonConf);
     args.set_topology(topology);
      sendBase("submitTopology", args);
    }
繼續調用:
public void recv_submitTopology() throws AlreadyAliveException, InvalidTopologyException, AuthorizationException, org.apache.thrift.TException
    {
      submitTopology_result result = new submitTopology_result();
      receiveBase(result, "submitTopology");
      if (result.e != null) {
        throw result.e;
      }
      if (result.ite != null) {
        throw result.ite;
      }
      if (result.aze != null) {
        throw result.aze;
      }
      return;
}
三、任務配置設定
在上面我們已經将topology送出到到nimbus了,下一步就是任務配置設定,strom預設4種配置設定政策。
DefaultScheduler政策,DefaultScheduler其實主要有幾步
1、首先是擷取目前叢集中需要進行任務配置設定的topology
2、擷取整個叢集可用的slot
3、擷取目前topology需要配置設定的executor資訊
4、計算目前叢集可釋放的slot
5、統計可釋放的solt和空閑的solt
6、執行topology配置設定
下面我們用一個列子來說明
比如初始狀态下,叢集的狀态如下:2個supervisor,每個supervisor有4個可用的端口,這裡我已A,B分别代表2個supervisor,那麼初始情況下整個叢集可用的端口位址就是:
A-6700,A-6701,A-6703,A-6704,B-6700,B-6701,B6702,B-6703。
Step1:現在我送出一個topology到叢集,這個拓撲我給他配置設定2個worker端口,6個executor線程,每個線程預設運作一個任務就是6個task。當我們送出這個拓撲的時候,首先叢集會将可用的solts進行排序如上可用端口的順序,然後計算線程和任務的對應關系,這裡都是6個,格式為[start-task-id end-task-id]就[1,1][2,2][3,3],[4,4],[5,5],[6,6]然後配置設定到2個worker上,那麼每個worker分别跑3個線程即配置設定狀态為[3,3]。
綜上:配置設定的結果為:
[1,1],[2,2],[3,3] --->worker1
[4,4],[5,5],[6,6] --->worker2
而非常重要的是storm為了合理利用資源,在将可用slots排序後,依次選擇worker來運作任務,也就是worker1對應A--6700,worker2對應B--6700。
下面我們來看一下storm叢集的日志檔案
首先送出topology

然後看一下nimbus.log日志
2017-04-09 22:00:12.502 o.a.s.d.common [INFO] Started statistics report plugin...
2017-04-09 22:00:12.575 o.a.s.d.nimbus [INFO] Starting nimbus server for storm version '1.0.0'
2017-04-09 22:03:13.661 o.a.s.d.nimbus [INFO] Uploading file from client to /bigdata/storm/datas/nimbus/inbox/stormjar-f16a2908-869a-418d-a589-ff6c7968724f.jar
2017-04-09 22:03:16.163 o.a.s.d.nimbus [INFO] Finished uploading file from client: /bigdata/storm/datas/nimbus/inbox/stormjar-f16a2908-869a-418d-a589-ff6c7968724f.jar
2017-04-09 22:03:16.328 o.a.s.d.nimbus [INFO] Received topology submission for testTopologySubmit with conf {"topology.max.task.parallelism" nil, "topology.submitter.principal" "", "topology.acker.executors" nil, "topology.eventlogger.executors" 0, "topology.workers" 2, "topology.debug" false, "storm.zookeeper.superACL" nil, "topology.users" (), "topology.submitter.user" "root", "topology.kryo.register" nil, "topology.kryo.decorators" (), "storm.id" "testTopologySubmit-1-1491800596", "topology.name" "testTopologySubmit"}
2017-04-09 22:03:16.335 o.a.s.d.nimbus [INFO] uploadedJar /bigdata/storm/datas/nimbus/inbox/stormjar-f16a2908-869a-418d-a589-ff6c7968724f.jar
擷取叢集可用的solts:
可以看到配置設定到了slave1和slave2的6700端口
slave1--132機器
slave2-134機器
Step2:現在整個叢集還有A-6701,A-6702,A-6703,B-6701,B-6702,B-6703,現在假如我要送出一個新的topology,然後隻有1個worker,那麼它會配置設定到A-6701,那麼如果後面每次都送出隻需要一個worker的topology,那麼會導緻A機器端口已經被配置設定完了,而B機器還有3個可用的端口,所有storm的任務排程也不是很公平的,A機器已經滿載了,B機器還有3個可用端口。