我們知道在ASP.NET Web Forms中,一個URL請求往往對應一個aspx頁面,一個aspx頁面就是一個實體檔案,它包含對請求的處理。
而在ASP.NET MVC中,一個URL請求是由對應的一個Controller中的Action來處理的,由URL Routing來告訴MVC如何定位到正确的Controller和Action。
籠統的講,URL Routing包含兩個主要功能:解析URL 和 生成URL,本文将圍繞這兩個大點進行講解。
本文目錄
URL Routing 的定義方式
讓我們從下面這樣一個簡單的URL開始:
http://mysite.com/Admin/Index
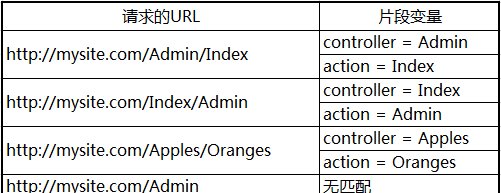
在域名的後面,預設使用“/”來對URL進行分段。路由系統通過類似于 {controller}/{action} 格式的字元串可以知道這個URL的 Admin 和 Index 兩個片段分别對應Controller和Action的名稱。
預設情況下,路由格式中用“/”分隔的段數是和URL域名的後面的段數是一緻的,比如,對于{controller}/{action} 格式隻會比對兩個片段。如下表所示:
URL路由是在MVC工程中的App_Start檔案夾下的RouteConfig.cs檔案中的RegisterRoutes方法中定義的,下面是建立一個空MVC項目時系統生成的一個簡單URL路由定義:
public static void RegisterRoutes(RouteCollection routes) {
    routes.IgnoreRoute("{resource}.axd/{*pathInfo}");

    routes.MapRoute(
        name: "Default",
        url: "{controller}/{action}/{id}",
        defaults: new { controller = "Home", action = "Index",  id = UrlParameter.Optional }
    );
}
靜态方法RegisterRoutes是在Global.asax.cs檔案中的Application_Start方法中被調用的,除了URL路由的定義外,還包含其他的一些MVC核心特性的定義:
protected void Application_Start() {
    AreaRegistration.RegisterAllAreas();

    WebApiConfig.Register(GlobalConfiguration.Configuration);
    FilterConfig.RegisterGlobalFilters(GlobalFilters.Filters);
    RouteConfig.RegisterRoutes(RouteTable.Routes);
    BundleConfig.RegisterBundles(BundleTable.Bundles);
}
RouteConfig.RegisterRoutes方法中傳遞的是 RouteTable 類的靜态 Routes 屬性,傳回一個RouteCollection的執行個體。其實,“原始”的定義路由的方法可以這樣寫:
public static void RegisterRoutes(RouteCollection routes) {

    Route myRoute = new Route("{controller}/{action}", new MvcRouteHandler());
    routes.Add("MyRoute", myRoute);
}
建立Route對象時用了一個URL格式字元串和一個MvcRouteHandler對象作為構造函數的參數。不同的ASP.NET技術有不同的RouteHandler,MVC用的是MvcRouteHandler。
這種寫法有點繁瑣,一種更簡單的定義方法是:
public static void RegisterRoutes(RouteCollection routes) {

    routes.MapRoute("MyRoute", "{controller}/{action}");
}
這種方法簡潔易讀,一般我們都會用這種方法定義路由。
示例準備
作為示範,我們先來準備一個Demo。建立一個标準的MVC應用程式,然後添加三個簡單的Controller,分别是HomeController、CustomerController和AdminController,代碼如下:

public class HomeController : Controller {

    public ActionResult Index() {
        ViewBag.Controller = "Home";
        ViewBag.Action = "Index";
        return View("ActionName");
    }
}
HomeController
public class CustomerController : Controller {

    public ActionResult Index() {
        ViewBag.Controller = "Customer";
        ViewBag.Action = "Index";
        return View("ActionName");
    }

    public ActionResult List() {
        ViewBag.Controller = "Customer";
        ViewBag.Action = "List";
        return View("ActionName");
    }
}
CustomerController
public class AdminController : Controller {

    public ActionResult Index() {
        ViewBag.Controller = "Admin";
        ViewBag.Action = "Index";
        return View("ActionName");
    }
}
AdminController
在 /Views/Shared 檔案夾下再給這三個Controller添加一個共享的名為 ActionName.cshtml 的 View,代碼如下:
@{
    Layout = null;
}

<!DOCTYPE html>
<html>
<head>
    <meta name="viewport" content="width=device-width" />
    <title>ActionName</title>
</head>
<body>
    <div>The controller is: @ViewBag.Controller</div>
    <div>The action is: @ViewBag.Action</div>
</body>
</html>
ActionName.cshtml
我們把RouteConfig.cs檔案中項目自動生成的URL Rounting的定義删了,然後根據前面講的路由定義知識,我們自己寫一個最簡單的:
public static void RegisterRoutes(RouteCollection routes) {

    routes.MapRoute("MyRoute", "{controller}/{action}");
}
程式運作,URL定位到 Admin/Index 看看運作結果:
這個Demo輸出的是被調用的Controller和Action名稱。
給片段變量定義預設值
在上面我們必須把URL定位到特定Controller和Action,否則程式會報錯,因為MVC不知道去執行哪個Action。 我們可以通過指定預設值來告訴MVC當URL沒有給出對應的片段時使用某個預設的值。如下給controller和action指定預設值:
routes.MapRoute("MyRoute", "{controller}/{action}", new { controller = "Home", action = "Index" }); 這時候如果在URL中不提供action片段的值或不提供controller和action兩個片段的值,MVC将使用路由定義中提供的預設值:
它的各種比對情況如下表所示:
注意,對于上面的URL路由的定義,我們可以隻給action一個片段指定預設值,但是不能隻給controller一個片段指定預設值,即如果我們給Controller指定了預設值,就一定也要給action指定預設值,否則URL隻有一個片段時,這個片段比對給了controller,action将找不到比對。
定義靜态片段
并不是所有的片段都是用來作為比對變量的,比如,我們想要URL加上一個名為Public的固定字首,那麼我們可以這樣定義:
routes.MapRoute("", "Public/{controller}/{action}", new { controller = "Home", action = "Index" }); 這樣,請求的URL也需要一個Public字首與之比對。我們也可以把靜态的字元串放在大括号以外的任何位置,如:
routes.MapRoute("", "X{controller}/{action}", new { controller = "Home", action = "Index" }); 在一些情況下這種定義非常有用。比如當你的網站某個連結已經被使用者普遍記住了,但這一塊功能已經有了一個新的版本,但調用的是不同名稱的controller,那麼你把原來的controller名稱作為現在controller的别名。這樣,使用者依然使用他們記住的URL,而導向的卻是新的controller。如下使用Shop作為Home的一個别名:
routes.MapRoute("ShopSchema", "Shop/{action}", new { controller = "Home" }); 這樣,使用者使用原來的URL可以通路新的controller:
自定義片段變量
自定義片段變量的定義和取值
contrlloer和action片段變量對MVC來說有着特殊的意義,在定義一個路由時,我們必須有這樣一個概念:contrlloer和action的變量值要麼能從URL中比對得到,要麼由預設值提供,總之一個URL請求經過路由系統交給MVC處理時必須保證contrlloer和action兩個變量的值都有。當然,除了這兩個重要的片段變量,我們也可從通過自定義片段變量來從URL中得到我們想要的其它資訊。如下自定義了一個名為Id的片段變量,而且給它定義了預設值:
routes.MapRoute("MyRoute", "{controller}/{action}/{id}",
    new {
        controller = "Home",
        action = "Index",
        id = "DefaultId"
});
我們在HomeController中增加一個名為CustomVariable的ACtion來示範一下如何取自定義的片段變量:
public ActionResult CustomVariable() {
    ViewBag.Controller = "Home";
    ViewBag.Action = "CustomVariable";
    ViewBag.CustomVariable = RouteData.Values["id"];
    return View("ActionName");
}
可以通過 RouteData.Values[segment] 來取得任意一個片段的變量值。
再稍稍改一下ActionName.cshtml 來看一下我們取到的自定義片段變量的值:
...
<div>The controller is: @ViewBag.Controller</div>
<div>The action is: @ViewBag.Action</div>
<div>The custom variable is: @ViewBag.CustomVariable</div>
...
将URL定位到 /Home/CustomVariable/Hello 将得到如下結果:
自定義的片段變量用處很大,也很靈活,下面介紹一些常見的用法。
将自定義片段變量作為Action方法的參數
我們可以将自定義的片段變量當作參數傳遞給Action方法,如下所示:
public ActionResult CustomVariable(string id) {
    ViewBag.Controller = "Home";
    ViewBag.Action = "CustomVariable";
    ViewBag.CustomVariable = id;
    return View("ActionName");
}
效果和上面是一樣的,隻不過這樣省去了用 RouteData.Values[segment] 的方式取自定義片段變量的麻煩。這個操作背後是由模型綁定來做的,模型綁定的知識我将在後續博文中進行講解。
指定自定義片段變量為可選
指定自定片段變量為可選,即在URL中可以不用指定片段的值。如下面的定義将Id定義為可選:
routes.MapRoute("MyRoute", "{controller}/{action}/{id}", new {
        controller = "Home",
        action = "Index",
        id = UrlParameter.Optional
});
定義為可選以後,需要對URL中沒有Id這個片段值的情況進行處理,如下:
public ActionResult CustomVariable(string id) {
    ViewBag.Controller = "Home";
    ViewBag.Action = "CustomVariable";
    ViewBag.CustomVariable = id == null ? "<no value>" : id;
    return View("ActionName");
}
當Id是整型的時候,參數的類型需要改成可空的整型(即int? id)。
為了省去判斷參數是否為空,我們也可以把Action方法的id參數也定義為可選,當沒有提供Id參數時,Id使用預設值,如下所示:
public ActionResult CustomVariable(string id = "DefaultId") {
    ViewBag.Controller = "Home";
    ViewBag.Action = "CustomVariable";
    ViewBag.CustomVariable = id;
    return View("ActionName");
}
這樣其實就是和使用下面這樣的方式定義路由是一樣的:
routes.MapRoute("MyRoute", "{controller}/{action}/{id}", new { controller = "Home", action = "Index", id = "DefaultId" }); 定義可變數量的自定義片段變量
我們可以通過 catchall 片段變量加 * 号字首來定義比對任意數量片段的路由。如下所示:
routes.MapRoute("MyRoute", "{controller}/{action}/{id}/{*catchall}",
    new { controller = "Home", action = "Index",  id = UrlParameter.Optional });
這個路由定義的比對情況如下所示:
使用*catchall,将比對的任意數量的片段,但我們需要自己通過“/”分隔catchall變量的值來取得獨立的片段值。
路由限制
正規表達式限制
通過正規表達式,我們可以制定限制URL的路由規則,下面的路由定義限制了controller片段的變量值必須以 H 打頭:
routes.MapRoute("MyRoute", "{controller}/{action}/{id}",
    new { controller = "Home", action = "Index", id = UrlParameter.Optional },
    new { controller = "^H.*" }
);
定義路由限制是在MapRoute方法的第四個參數。和定義預設值一樣,也是用匿名類型。
我們可以用正規表達式限制來定義隻有指定的幾個特定的片段值才能進行比對,如下所示:
routes.MapRoute("MyRoute", "{controller}/{action}/{id}",
    new { controller = "Home", action = "Index", id = UrlParameter.Optional },
    new { controller = "^H.*", action = "^Index$|^About$" }
);
這個定義,限制了action片段值隻能是Index或About,不區分大小寫。
Http請求方式限制
我們還可以限制路由隻有當以某個特定的Http請求方式才能比對。如下限制了隻能是Get請求才能進行比對:
routes.MapRoute("MyRoute", "{controller}/{action}/{id}",
    new { controller = "Home", action = "Index", id = UrlParameter.Optional },
    new { controller = "^H.*", httpMethod = new HttpMethodConstraint("GET") }
);
通過建立一個 HttpMethodConstraint 類的執行個體來定義一個Http請求方式限制,構造函數傳遞是允許比對的Http方法名。這裡的httpMethod屬性名不是規定的,隻是為了區分。
這種限制也可以通過HttpGet或HttpPost過濾器來實作,後續博文再講到濾器的内容。
自定義路由限制
如果标準的路由限制滿足不了你的需求,那麼可以通過實作 IRouteConstraint 接口來定義自己的路由限制規則。
我們來做一個限制浏覽器版本通路的路由限制。在MVC工程中添加一個檔案夾,取名Infrastructure,然後添加一個 UserAgentConstraint 類檔案,代碼如下:
public class UserAgentConstraint : IRouteConstraint {

    private string requiredUserAgent;

    public UserAgentConstraint(string agentParam) {
        requiredUserAgent = agentParam;
    }

    public bool Match(HttpContextBase httpContext, Route route, string parameterName,
        RouteValueDictionary values, RouteDirection routeDirection) {

        return httpContext.Request.UserAgent != null
            && httpContext.Request.UserAgent.Contains(requiredUserAgent);
    }
}
這裡實作IRouteConstraint的Match方法,傳回的bool值告訴路由系統請求是否滿足自定義的限制規則。我們的UserAgentConstraint類的構造函數接收一個浏覽器名稱的關鍵字作為參數,如果使用者的浏覽器包含注冊的關鍵字才可以通路。接一來,我們需要注冊自定的路由限制:
public static void RegisterRoutes(RouteCollection routes) {

    routes.MapRoute("ChromeRoute", "{*catchall}",
        new { controller = "Home", action = "Index" },
        new { customConstraint = new UserAgentConstraint("Chrome") }
    );
}
下面分别是IE10和Chrome浏覽器請求的結果:
定義請求磁盤檔案路由
并不是所有的URL都是請求controller和action的。有時我們還需要請求一些資源檔案,如圖檔、html檔案和JS庫等。
我們先來看看能不能直接請求一個靜态Html檔案。在項目的Content檔案夾下,添加一個html檔案,内容随意。然後把URL定位到該檔案,如下圖:
我們看到,是可以直接通路一靜态資源檔案的。
預設情況下,路由系統先檢查URL是不是請求靜态檔案的,如果是,伺服器直接傳回檔案内容并結束對URL的路由解析。我們可以通過設定 RouteCollection的 RouteExistingFiles 屬性值為true 讓路由系統對靜态檔案也進行路由比對,如下所示:
public static void RegisterRoutes(RouteCollection routes) {

    routes.RouteExistingFiles = true;

    routes.MapRoute("MyRoute", "{controller}/{action}/{id}/{*catchall}",
        new { controller = "Home", action = "Index", id = UrlParameter.Optional
    });
}
設定了routes.RouteExistingFiles = true後,還需要對IIS進行設定,這裡我們以IIS Express為例,右鍵IIS Express小圖示,選擇“顯示所有應用程式”,彈出如下視窗:
點選并打開配置檔案,Control+F找到UrlRoutingModule-4.0,将這個節點的preCondition屬性改為空,如下所示:
<add name="UrlRoutingModule-4.0" type="System.Web.Routing.UrlRoutingModule" preCondition=""/> 然後我們運作程式,再把URL定位到之前的靜态檔案:
這樣,路由系統通過定義的路由去比對RUL,如果路由中沒有定義該靜态檔案的比對,則會報上面的錯誤。
一旦定義了routes.RouteExistingFiles = true,我們就要為靜态檔案定義路由,如下所示:
public static void RegisterRoutes(RouteCollection routes) {

    routes.RouteExistingFiles = true;

    routes.MapRoute("DiskFile", "Content/StaticContent.html",
        new { controller = "Customer", action = "List", });

    routes.MapRoute("MyRoute", "{controller}/{action}/{id}/{*catchall}",
        new { controller = "Home", action = "Index", id = UrlParameter.Optional });
}
這個路由比對Content/StaticContent.html的URL請求為controller = Customer, action = List。我們來看看運作結果:
這樣做的目的是為了可以在Controller的Action中控制對靜态資源的請求,并且可以阻止對一些特殊資源檔案的通路。
設定了RouteExistingFiles屬性為true後,我們要為允許使用者請求的資源檔案進行路由定義,如果每種資源檔案都去定義相應的路由,就會顯得很繁瑣。
我們可以通過RouteCollection類的IgnoreRoute方法繞過路由定義,使得某些特定的靜态檔案可以由伺服器直接傳回給給浏覽器,如下所示:
public static void RegisterRoutes(RouteCollection routes) {

    routes.RouteExistingFiles = true;

    routes.IgnoreRoute("Content/{filename}.html");

    routes.MapRoute("DiskFile", "Content/StaticContent.html",
        new { controller = "Customer", action = "List", });

    routes.MapRoute("MyRoute", "{controller}/{action}/{id}/{*catchall}",
        new { controller = "Home", action = "Index", id = UrlParameter.Optional });
}
這樣,隻要是請求Content目錄下的任何html檔案都能被直接傳回。這裡的IgnoreRoute方法将建立一個RouteCollection的執行個體,這個執行個體的Route Handler 為 StopRoutingHandler,而不是 MvcRouteHandler。運作程式定位到Content/StaticContent.html,我們又看到了之前的靜态面面了。
生成URL(連結)
前面講的都是解析URL的部分,現在我們來看看如何通過路由系統在View中生成URL。
生成指向目前controller的action連結
在View中生成URL的最簡單方法就是調用Html.ActionLink方法,如下面在 Views/Shared/ActionName.cshtml 中的代碼所示:
...
<div>The controller is: @ViewBag.Controller</div>
<div>The action is: @ViewBag.Action</div>
<div>
    @Html.ActionLink("This is an outgoing URL", "CustomVariable")
</div>
...
這裡的Html.ActionLink方法将會生成指向View對應的Controller和第二個參數指定的Action,我們可以看看運作後頁面是如何顯示的:
經過檢視Html源碼,我們發現它生成了下面這樣的一個html連結:
<a href="/Home/CustomVariable">This is an outgoing URL</a> 這樣看起來,通過Html.ActionLink生成URL似乎并沒有直接在View中自己寫一個<a>标簽更直接明了。 但它的好處是,它會自動根據路由配置來生成URL,比如我們要生成一個指向HomeContrller中的CustomVariable Action的連接配接,通過Html.ActionLink方法,隻需要給出對應的Controller和Action名稱就行,我們不需要關心實際的URL是如何組織的。舉個例子,我們定義了下面的路由:
public static void RegisterRoutes(RouteCollection routes) {

    routes.MapRoute("NewRoute", "App/Do{action}", new { controller = "Home" });

    routes.MapRoute("MyRoute", "{controller}/{action}/{id}",
        new { controller = "Home", action = "Index", id = UrlParameter.Optional });
}
運作程式,我們發現它會自動生成下面這樣的連接配接:
<a href="/App/DoCustomVariable">This is an outgoing URL</a> 是以我們要生成指向某個Action的連結時,最好使用Html.ActionLink方法,否則你很難保證你手寫的連接配接就能定位到你想要的Action。
生成其他controller的action連結
上面我們給Html.ActionLink方法傳遞的第二個參數隻告訴了路由系統要定位到目前View對應的Controller下的Action。Html.ActionLink方法可以使用第三個參數來指定其他的Controller,如下所示:
<div>
    @Html.ActionLink("This targets another controller", "Index", "Admin")
</div>
它會自動生成如下連結:
<a href="/Admin">This targets another controller</a> 生成帶有URL參數的連結
有時候我們想在連接配接後面加上參數以傳遞資料,如 ?id=xxx 。那麼我們可以給Html.ActionLink方法指定一個匿名類型的參數,如下所示:
<div>
    @Html.ActionLink("This is an outgoing URL", "CustomVariable", new { id = "Hello" })
</div>
它生成的Html如下:
<a href="/Home/CustomVariable/Hello">This is an outgoing URL</a> 指定連結的Html屬性
通過Html.ActionLink方法生成的連結是一個a标簽,我們可以在方法的參數中給标簽指定Html屬性,如下所示:
<div>
    @Html.ActionLink("This is an outgoing URL",  "Index", "Home", null,
        new {id = "myAnchorID", @class = "myCSSClass"})
</div>
這裡的class加了@符号,是因為class是C#關鍵字,@符号起到轉義的作用。它生成 的Html代碼如下:
<a class="myCSSClass" href="/" id="myAnchorID">This is an outgoing URL</a> 生成完整的标準連結
前面的都是生成相對路徑的URL連結,我們也可以通過Html.ActionLink方法生成完整的标準連結,方法如下:
<div>
    @Html.ActionLink("This is an outgoing URL", "Index", "Home",
        "https", "myserver.mydomain.com", " myFragmentName",
        new { id = "MyId"},
        new { id = "myAnchorID", @class = "myCSSClass"})
</div>
這是Html.ActionLink方法中最多參數的重載方法,它允許我們提供請求的協定(https)和目标伺服器位址(myserver.mydomain.com)等。它生成的連結如下:
<a class="myCSSClass" id="myAnchorID"
    href="https://myserver.mydomain.com/Home/Index/MyId#myFragmentName" >
    This is an outgoing URL</a>
生成URL字元串
用Html.ActionLink方法生成一個html連結是非常有用而常見的,如果要生成URL字元串(而不是一個Html連結),我們可以用 Url.Action 方法,使用方法如下:
<div>This is a URL:
    @Url.Action("Index", "Home", new { id = "MyId" })
</div>
它顯示到頁面是這樣的:
根據指定的路由名稱生成URL
我們可以根據某個特定的路由來生成我們想要的URL,為了更好說明這一點,下面給出兩個URL的定義:
public static void RegisterRoutes(RouteCollection routes) {
    routes.MapRoute("MyRoute", "{controller}/{action}");
    routes.MapRoute("MyOtherRoute", "App/{action}", new { controller = "Home" });
}
對于這樣的兩個路由,對于類似下面這樣的寫法:
@Html.ActionLink("Click me", "Index", "Customer") 始終會生成這樣的連結:
<a href="/Customer/Index">Click me</a> 也就是說,永遠無法使用第二個路由來生成App字首的連結。這時候我們需要通過另一個方法Html.RouteLink來生成URL了,方法如下:
@Html.RouteLink("Click me", "MyOtherRoute","Index", "Customer") 它會生成如下連結:
<a Length="8" href="/App/Index?Length=5">Click me</a> 這個連結指向的是HomeController下的Index Action。但需要注意,通過這種方式來生成URL是不推薦的,因為它不能讓我們從直覺上看到它生成的URL指向的controller和action。是以,非到萬不得已的情況才會這樣用。
在Action方法中生成URL
通常我們一般在View中才會去生成URL,但也有時候我們需要在Action中生成URL,方法如下:
public ViewResult MyActionMethod() {

    string myActionUrl = Url.Action("Index", new { id = "MyID" });
    string myRouteUrl = Url.RouteUrl(new { controller = "Home", action = "Index" });

    //... do something with URLs...
    return View();
}
其中 myActionUrl 和 myRouteUrl 将會被分别指派 /Home/Index/MyID 和 / 。
更多時候我們會在Action方法中将用戶端浏覽器重定向到别的URL,這時候我們使用RedirectToAction方法,如下:
public RedirectToRouteResultMyActionMethod() {
    return RedirectToAction("Index");
}
RedirectToAction的傳回結果是一個RedirectToRouteResult類型,它使MVC觸發一個重定向行為,并調用指定的Action方法。RedirectToAction也有一些重載方法,可以傳入controller等資訊。也可以使用RedirectToRoute方法,該方法傳入的是object匿名類型,易讀性強,如:
public RedirectToRouteResult MyActionMethod() {
    return RedirectToRoute(new { controller = "Home", action = "Index", id = "MyID" });
}
URL方案最佳實踐
下面是一些使用URL的建議:
- 最好能直覺的看出URL的意義,不要用應用程式的具體資訊來定義URL。比如使用 /Articles/Report 比使用 /Website_v2/CachedContentServer/FromCache/Report 好。
- 使用内容标題比使用ID好。比如使用 /Articles/AnnualReport 比使用 /Articles/2392 好。如果一定要使用使用ID(比如有時候可能需要區分相同的标題),那麼就兩者都用,如 /Articles/2392/AnnualReport ,它看起來很長,但對使用者更友好,而且更利于SEO。
- 對于Web頁面不要使用檔案擴充名(如 .aspx 或 .mvc)。但對于特殊的檔案使用擴充名(如 .jpg、.pdf 和 .zip等)。
- 盡可能使用層級關系的URL,如 /Products/Menswear/Shirts/Red,這樣使用者就能猜到父級URL。
- 不區分大小寫,這樣友善使用者輸入。
- 正确使用Get和Post。Get一般用來從伺服器擷取隻讀的資訊,當需要操作更改狀态時使用Post。
- 盡可能避免使用标記符号、代碼、字元序列等。如果你想要用标記進行分隔,就使用中劃線(如 /my-great-article),下劃線是不友好的,另外空格和+号都會被URL編碼。
- 不要輕易改變URL,尤其對于網際網路網站。如果一定要改,那也要盡可能長的時間保留原來的URL。
- 盡量讓URL使用統一的風格或習慣。
參考:
《Pro ASP.NET MVC 4 4th Edition》
http://msdn.microsoft.com/en-us/library/cc668201.ASPX
http://www.asp.net/mvc/tutorials/older-versions/controllers-and-routing/asp-net-mvc-routing-overview-cs
作者:精緻碼農-王亮
出處:http://cnblogs.com/willick
本文版權歸作者和部落格園共有,歡迎轉載,但未經作者同意必須保留此段聲明,且在文章頁面明顯位置給出原文連接配接,否則保留追究法律責任的權利。如有問題或建議,請多多賜教,非常感謝。